Tech Stack
Click on a technology category to see the tools, then select a tool to view a sample code snippet or configuration.
CI/CD


Containerization

IaC

Artifact Management

DevSecOps
Cloud
Observability


Data Management
Welcome to the Tech Stack Page
The technologies presented here are being used for the deployment of this website,
demonstrated either by a code snippet, a screenshot, or a simple explanation.
Click any of the dropdown menus above to see what technologies are included
and what part they take in this website's deployment, environment, infrastructure, and more.
Jenkinsfile
The most commonly used, powerful, declarative CI tool, an open-source automation server with a massive plugin ecosystem, perfect for building, deploying, and automating any CI/CD pipeline. I am using the following stages to make sure that I build a resilient and secure image, that will be versioned and pushed to my Artifact storage.
    environment {
        AWS_REGION      = "us-east-1"
        ECR_REGISTRY    = "${AWS_ACCOUNT_ID}.dkr.ecr.us-east-1.amazonaws.com"
        ECR_REPOSITORY  = "mywebsite"
        IMAGE_FILE_NAME = "my-app-image.tar"
        BRANCH_NAME     = "${env.GIT_BRANCH?.replaceAll(/[^a-zA-Z0-9]/, '-')}"
        IMAGE_TAG       = "1.${env.BUILD_NUMBER}-${BRANCH_NAME}"
    }
        stage('Checkout') {
            steps {
                checkout scm
            }
        }
        stage('Build Image') {
            steps {
                script {
                    sh """
                        echo "Building Docker image..."
                        docker build -t ${ECR_REGISTRY}/${ECR_REPOSITORY}:${IMAGE_TAG} .
                        docker save ${ECR_REGISTRY}/${ECR_REPOSITORY}:${IMAGE_TAG} -o ${IMAGE_FILE_NAME}
                    """
                    archiveArtifacts artifacts: "${IMAGE_FILE_NAME}", fingerprint: true
                }
            }
        }
        stage('Integration Test - Database') {
            when {
                expression {
                    return env.BRANCH_NAME == "database" || (env.GIT_COMMIT && sh(script: "git log -1 --pretty=%B | grep -E 'db|database' || true", returnStatus: true) == 0)
                }
            }
            steps {
                script {
                    sh """
                        echo "Running Database Integration Tests..."
                        curl -L "https://github.com/docker/compose/releases/download/v2.21.0/docker-compose-$(uname -s)-$(uname -m)" -o /usr/local/bin/docker-compose
                        chmod +x /usr/local/bin/docker-compose
                        docker load -i ${IMAGE_FILE_NAME}
                        docker-compose -f docker-compose.ci.yaml -p ci up -d
                        echo "Waiting for services..."
                        sleep 15
                        docker run --rm --network=ci_default \
                            -v $(pwd)/test_db.py:/test_db.py \
                            -e POSTGRES_HOST=db \
                            -e POSTGRES_DB=mywebsite \
                            -e POSTGRES_USER=admin \
                            -e POSTGRES_PASSWORD=password \
                            --entrypoint="" python:3.9-slim \
                            sh -c "pip install psycopg2-binary requests && python -u /test_db.py"
                    """
                }
            }
            post {
                always {
                    sh "docker-compose -f docker-compose.ci.yaml -p ci down || true"
                }
            }
        }
        stage('Integration Test - App Only') {
            when {
                expression {
                    return !(env.BRANCH_NAME == "database" || (env.GIT_COMMIT && sh(script: "git log -1 --pretty=%B | grep -E 'db|database' || true", returnStatus: true) == 0))
                }
            }
            steps {
                script {
                    sh """
                        echo "Running application-only tests..."
                        echo "Application test placeholder successful!"
                    """
                }
            }
        }
        stage('Security Scan') {
            steps {
                script {
                    sh """
                        echo "Running Gitleaks scan..."
                        docker run --rm -v $(pwd):/repo zricethezav/gitleaks:latest detect --source=/repo --no-git -v || true

                        echo "Running Trivy scan..."
                        docker run --rm -v $(pwd):/work -v /var/run/docker.sock:/var/run/docker.sock \
                            aquasec/trivy image --exit-code 1 --severity HIGH,CRITICAL \
                            ${ECR_REGISTRY}/${ECR_REPOSITORY}:${IMAGE_TAG} || true
                    """
                }
            }
        }
        stage('Push to ECR') {
            when {
                expression { return !sh(script: "git log -1 --pretty=%B | grep 'skip' || true", returnStatus: true) == 0 }
            }
            steps {
                script {
                    withCredentials([
                        [$class: 'AmazonWebServicesCredentialsBinding', credentialsId: 'aws-jenkins-creds']
                    ]) {
                        sh """
                            echo "Logging into Amazon ECR..."
                            aws ecr get-login-password --region ${AWS_REGION} | docker login --username AWS --password-stdin ${ECR_REGISTRY}
                            docker load -i ${IMAGE_FILE_NAME}
                            docker push ${ECR_REGISTRY}/${ECR_REPOSITORY}:${IMAGE_TAG}
                        """
                    }
                }
            }
        }
        stage('Update Kubernetes Manifest Repo') {
            steps {
                script {
                    sshagent(['github-pat']) {
                        sh """
                            echo "Cloning Kubernetes manifest repo..."
                            git clone --branch ${BRANCH_NAME} https://github.com/liormilliger/mywebsite-k8s.git
                            cd mywebsite-k8s
                            wget https://github.com/mikefarah/yq/releases/latest/download/yq_linux_amd64 -O /usr/bin/yq
                            chmod +x /usr/bin/yq
                            yq eval '.image.tag = "${IMAGE_TAG}"' -i my-app-chart/values.yaml
                            git config user.name "Jenkins"
                            git config user.email "jenkins@local"
                            git commit -am "Update image tag for mywebsite to ${IMAGE_TAG}" || echo "No changes"
                            git push
                        """
                    }
                }
            }
        }
    post {
        always {
            echo "Pipeline completed for branch: ${BRANCH_NAME}"
        }
    }
}
push-image.yaml
A modern, fully-managed CI/CD platform integrated directly into GitHub. This workflow automates building a Docker image, running tests, pushing it to Amazon ECR, and then updating a Kubernetes manifest repository with the new image tag. The process is triggered by a push to the main branch.
name: Build, Test, and Push Docker Image to ECR

on:
  push:
    branches: [ "main" ]
  workflow_dispatch:

env:
  AWS_REGION: us-east-1
  ECR_REGISTRY: ACCOUNT_ID.dkr.ecr.us-east-1.amazonaws.com
  ECR_REPOSITORY: mywebsite
  IMAGE_FILE_NAME: my-app-image.tar
jobs:
  # ===============================================
  # Job 1: Build the Docker Image
  # ===============================================
  build:
    name: Build Image
    runs-on: ubuntu-latest
    outputs:
      image_tag: ${{ steps.version.outputs.IMAGE_TAG }}
    steps:
      - name: Checkout repository
        uses: actions/checkout@v4

      - name: Define Image Version Tag
        id: version
        run: |
          VERSION="1.${{ github.run_number }}.0"
          echo "IMAGE_TAG=${VERSION}" >> $GITHUB_OUTPUT

      - name: Build Docker image
        run: |
          docker build -t ${{ env.ECR_REGISTRY }}/${{ env.ECR_REPOSITORY }}:${{ steps.version.outputs.IMAGE_TAG }} .

      - name: Save Docker image as an artifact
        run: |
          docker save ${{ env.ECR_REGISTRY }}/${{ env.ECR_REPOSITORY }}:${{ steps.version.outputs.IMAGE_TAG }} --output ${{ env.IMAGE_FILE_NAME }}

      - name: Upload image artifact
        uses: actions/upload-artifact@v4
        with:
          name: docker-image
          path: ${{ env.IMAGE_FILE_NAME }}
  # ===============================================
  # Job 2: Test the Docker Image
  # ===============================================
  test:
    name: Test Image
    runs-on: ubuntu-latest
    needs: build
    steps:
      - name: Download image artifact
        uses: actions/download-artifact@v4
        with:
          name: docker-image

      - name: Load Docker image
        run: |
          docker load --input ${{ env.IMAGE_FILE_NAME }}

      - name: Run container locally and perform healthcheck
        run: |
          IMAGE_NAME=$(docker images --format '{{.Repository}}:{{.Tag}}' | head -n 1)
          docker run -d --name my-app-test -p 8080:5000 $IMAGE_NAME
          echo "Waiting for container to start..."
          sleep 15
          echo "Performing healthcheck..."
          curl --fail http://localhost:8080/ || exit 1
          echo "Healthcheck passed!"
          docker stop my-app-test
  # ===============================================
  # Job 3: Push the Image to ECR
  # ===============================================
  push:
    name: Push Image to ECR
    runs-on: ubuntu-latest
    needs: [build, test]
    steps:
      - name: Configure AWS credentials
        uses: aws-actions/configure-aws-credentials@v4
        with:
          aws-access-key-id: ${{ secrets.AWS_ACCESS_KEY_ID }}
          aws-secret-access-key: ${{ secrets.AWS_SECRET_ACCESS_KEY }}
          aws-region: ${{ env.AWS_REGION }}

      - name: Login to Amazon ECR
        id: login-ecr
        uses: aws-actions/amazon-ecr-login@v2

      - name: Download image artifact
        uses: actions/download-artifact@v4
        with:
          name: docker-image

      - name: Load Docker image
        run: |
          docker load --input ${{ env.IMAGE_FILE_NAME }}

      - name: Tag and Push image to Amazon ECR
        run: |
          IMAGE_TAG="${{ needs.build.outputs.image_tag }}"
          docker tag ${{ env.ECR_REGISTRY }}/${{ env.ECR_REPOSITORY }}:$IMAGE_TAG ${{ env.ECR_REGISTRY }}/${{ env.ECR_REPOSITORY }}:latest
          docker push ${{ env.ECR_REGISTRY }}/${{ env.ECR_REPOSITORY }} --all-tags
  # ===============================================
  # Job 4: Update Kubernetes Manifest Repo
  # ===============================================
  update-kubernetes-repo:
    name: Update Kubernetes Manifest
    runs-on: ubuntu-latest
    needs: [build, push] # Runs after build (to get the tag) and push (to ensure image exists)

    steps:
      - name: Checkout Kubernetes repo
        uses: actions/checkout@v4
        with:
          repository: liormilliger/mywebsite-k8s
          token: ${{ secrets.GH_PAT }}

      - name: Install yq for YAML processing
        run: sudo wget https://github.com/mikefarah/yq/releases/latest/download/yq_linux_amd64 -O /usr/bin/yq && sudo chmod +x /usr/bin/yq

      - name: Update image tag in values.yaml
        run: |
          IMAGE_TAG="${{ needs.build.outputs.image_tag }}"
          # This command targets the .image.tag key in your specified values.yaml file
          yq eval '.image.tag = "'"$IMAGE_TAG"'"' -i 'my-app-chart/values.yaml'

      - name: Commit and push changes
        run: |
          git config --global user.name "GitHub Actions"
          git config --global user.email "github-actions@github.com"
          git commit -am "Update image tag for mywebsite to ${{ needs.build.outputs.image_tag }}"
          git push
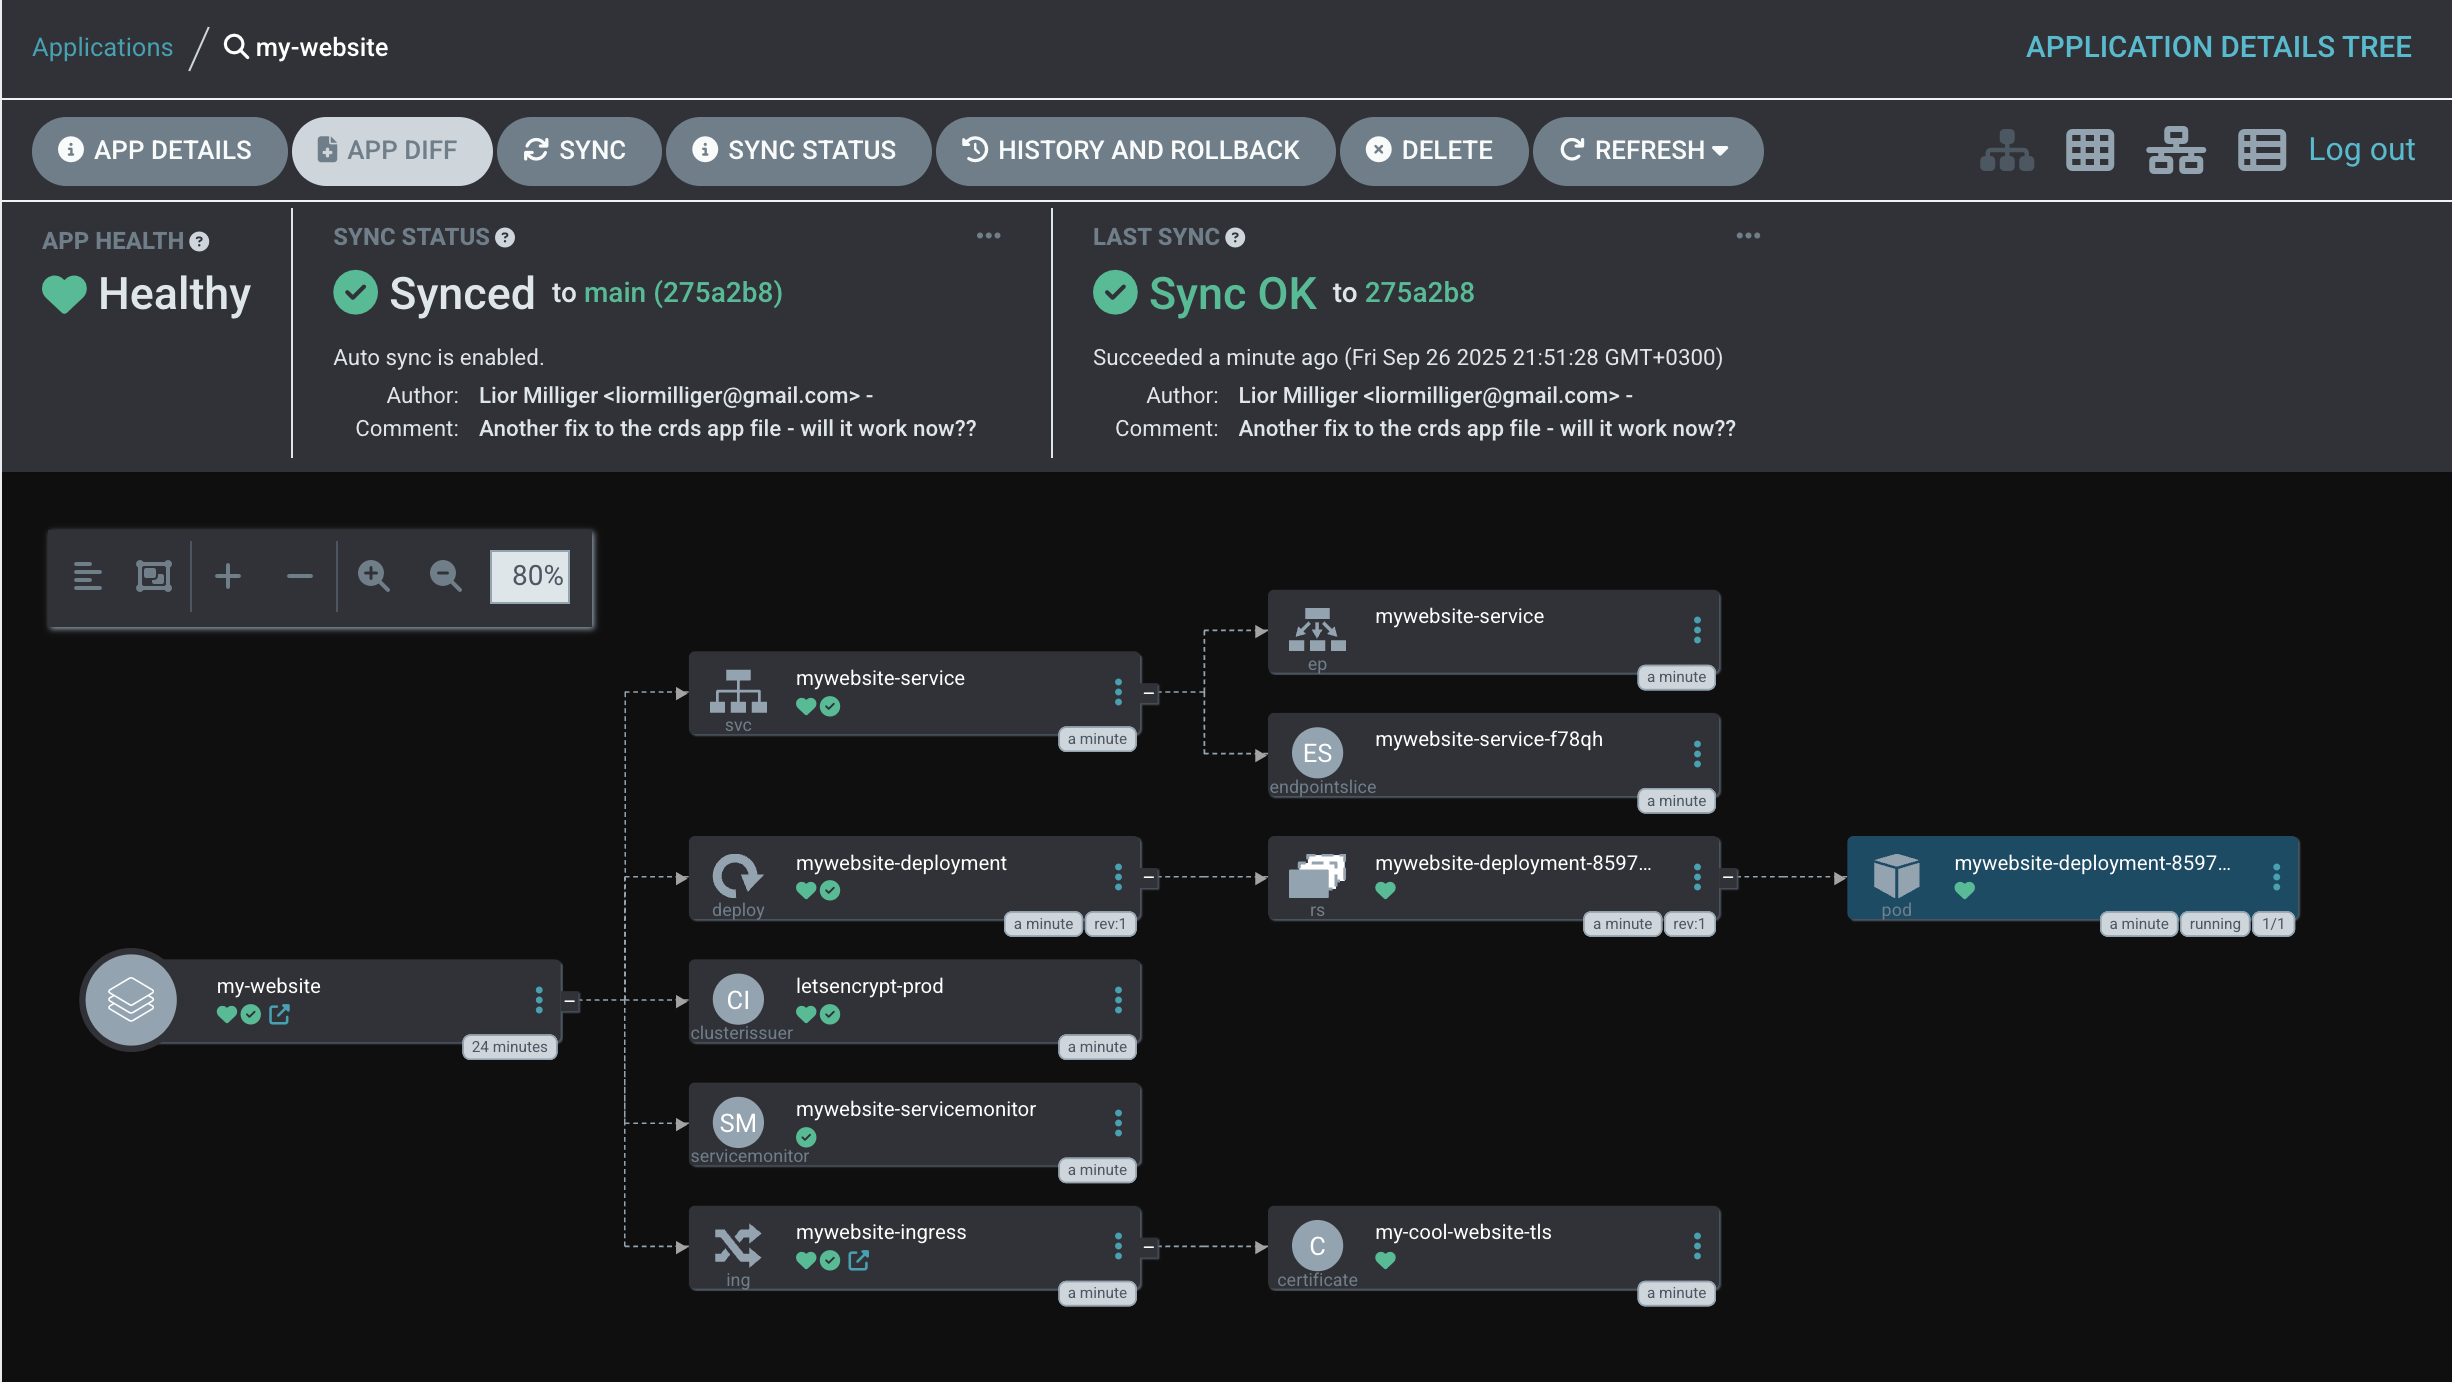
ArgoCD
ArgoCD, as part of GitOps, serves as a CD tool that manages the deployment state.
It listens to a git repository and react to changes within it and auto deploys.
I created app-of-apps application file that deploys few applications - I used my website application helm chart,
alongside with additional applications to support my app environment - Security, Load Balancing and Observability.
ArgoCD can visualize the deployment components im different view ,and enables multiple options for sync,
self/auto-healing and cluster-state check to validate the existing state is aligned with the desired state.
I chose to present this view to show the website application on all its components as ArgoCD shows it.
Containerization Strategy
The Dockerfile encapsulates the entire Python application, creating a self-contained image with a defined entry point. For deployment, docker-compose.yaml orchestrates the launch of the app as a set of interconnected microservices, including the database, a reverse proxy, and certificate services (CA) to expose the application securely. The streamlined docker-compose.ci.yaml is specifically for CI build and testing environments, where services like the proxy and certificate management are unnecessary.
FROM python:3.9-slim
WORKDIR /app
COPY ./app/requirements.txt .
RUN pip install --no-cache-dir -r requirements.txt
COPY ./app /app
EXPOSE 5000
CMD ["gunicorn", "--bind", "0.0.0.0:5000", "app:app"]
version: '3.8'

services:
  app:
    build: .
    container_name: mywebsite-app
    restart: unless-stopped
    expose:
      - "5000"
    volumes:
      - ./app:/app
    depends_on:
      db:
        condition: service_healthy
    environment:
      - DATABASE_URL=postgresql://${POSTGRES_USER}:${POSTGRES_PASSWORD}@db:5432/${POSTGRES_DB}

  nginx:
    image: nginx:latest
    container_name: mywebsite-nginx
    restart: always
    ports:
      - "80:80"
      - "443:443"
    volumes:
      - ./nginx/nginx.conf:/etc/nginx/conf.d/default.conf
      - ./data/certbot/conf:/etc/letsencrypt
      - ./data/certbot/www:/var/www/certbot
    depends_on:
      - app

  certbot:
    image: certbot/certbot
    container_name: mywebsite-certbot
    volumes:
      - ./data/certbot/conf:/etc/letsencrypt
      - ./data/certbot/www:/var/www/certbot
    command: sh -c "trap exit TERM; while :; do certbot renew; sleep 12h & wait $${!}; done;"

  db:
    image: postgres:15-alpine
    container_name: mywebsite-db
    restart: always
    environment:
      - POSTGRES_USER=${POSTGRES_USER}
      - POSTGRES_PASSWORD=${POSTGRES_PASSWORD}
      - POSTGRES_DB=${POSTGRES_DB}
    ports:
      - "5432:5432"
    volumes:
      - postgres_data:/var/lib/postgresql/data
      - ./init:/docker-entrypoint-initdb.d
    healthcheck:
      test: ["CMD-SHELL", "pg_isready -U ${POSTGRES_USER} -d ${POSTGRES_DB}"]
      interval: 10s
      timeout: 5s
      retries: 5

volumes:
  postgres_data:
version: '3.8'
services:
  db:
    image: postgres:15
    container_name: test-db
    environment:
      POSTGRES_DB: mywebsite
      POSTGRES_USER: admin
      POSTGRES_PASSWORD: password
    volumes:
      - ./init:/docker-entrypoint-initdb.d
    healthcheck:
      test: ["CMD-SHELL", "pg_isready -U admin -d mywebsite"]
      interval: 5s
      timeout: 5s
      retries: 5

  web:
    image: ${WEB_IMAGE}
    container_name: test-web
    environment:
      POSTGRES_HOST: db
      POSTGRES_DB: mywebsite
      POSTGRES_USER: admin
      POSTGRES_PASSWORD: password
    depends_on:
      db:
        condition: service_healthy
Kubernetes Manifests & GitOps Strategy
For a complete overview of the Kubernetes files and the repository structure,
please visit my Git repository:
https://github.com/liormilliger/mywebsite-k8s.git.
After containerizing my application, I create the necessary Kubernetes manifests.
This includes Deployment and Service files for each component, ensuring the correct labels and selectors are applied for proper service discovery and management.
Additionally, I create an Ingress manifest to manage external access, mapping the routing to my website's domain and securing it with TLS encryption.
This repository is managed via a GitOps workflow. I use Argo CD, which monitors the repo for changes. To facilitate this, I have also included Argo CD's Application manifests, enabling the "app-of-apps" pattern for automated, declarative deployment of any newly pushed images or configuration changes.
Helm ☸️ - Packing k8s Manifests
Helm streamlines Kubernetes application management by packaging all necessary manifest files into a single unit called a Chart. It uses a powerful templating engine to make these charts reusable across different environments, managing complex deployments with a simple, centralized configuration file.
apiVersion: apps/v1
kind: Deployment
metadata:
  name: mywebsite-deployment
spec:
  replicas: {{ .Values.app.replicaCount }}
  selector:
    matchLabels:
      app: mywebsite
  template:
    metadata:
      labels:
        app: mywebsite
    spec:
      containers:
      - name: mywebsite-app
        image: "{{ .Values.app.image.repository }}:{{ .Values.app.image.tag }}"
        imagePullPolicy: {{ .Values.app.image.pullPolicy }}
        ports:
        - containerPort: {{ .Values.app.containerPort }}
        env:
        - name: POSTGRES_HOST
          value: {{ .Values.database.host | quote }}
        - name: POSTGRES_DB
          valueFrom:
            configMapKeyRef:
              name: {{ .Values.objectNames.configMap }}
              key: POSTGRES_DB
        - name: POSTGRES_USER
          valueFrom:
            configMapKeyRef:
              name: {{ .Values.objectNames.configMap }}
              key: POSTGRES_USER
        - name: POSTGRES_PASSWORD
          valueFrom:
            secretKeyRef:
              name: {{ .Values.objectNames.secret }}
              key: postgres-password
apiVersion: v1
kind: Service
metadata:
  name: mywebsite-service
spec:
  type: {{ .Values.app.service.type }}
  selector:
    app: mywebsite
  ports:
    - name: web
      protocol: TCP
      port: {{ .Values.app.service.port }}
      targetPort: {{ .Values.app.service.targetPort }}
apiVersion: v1
kind: ConfigMap
metadata:
  name: {{ .Values.objectNames.configMap }}
data:
  POSTGRES_DB: {{ .Values.database.db | quote }}
  POSTGRES_USER: {{ .Values.database.user | quote }}
apiVersion: v1
kind: ConfigMap
metadata:
  name: postgres-init-script
data:
  init.sql: |
    CREATE TABLE IF NOT EXISTS visitors (
        ip_address INET PRIMARY KEY,
        first_visit_time TIMESTAMPTZ NOT NULL DEFAULT NOW(),
        last_visit_time TIMESTAMPTZ NOT NULL DEFAULT NOW(),
        user_agent TEXT
    );

    CREATE TABLE IF NOT EXISTS page_views (
        view_id SERIAL PRIMARY KEY,
        visitor_ip INET NOT NULL,
        page_route TEXT NOT NULL,
        view_timestamp TIMESTAMPTZ NOT NULL DEFAULT NOW(),
        CONSTRAINT fk_visitor_ip
            FOREIGN KEY(visitor_ip)
            REFERENCES visitors(ip_address)
            ON DELETE CASCADE
);apiVersion: apps/v1
kind: StatefulSet
metadata:
name: postgres-db
spec:
serviceName: {{ .Values.database.host }}
replicas: 1
selector:
matchLabels:
app: postgres-db
template:
metadata:
labels:
app: postgres-db
spec:
containers:
- name: postgres
image: "{{ .Values.database.image.repository }}:{{ .Values.database.image.tag }}"
ports:
- containerPort: 5432
name: postgres
envFrom:
- configMapRef:
name: {{ .Values.objectNames.configMap }}
env:
- name: POSTGRES_PASSWORD
valueFrom:
secretKeyRef:
name: {{ .Values.objectNames.secret }}
key: postgres-password
- name: PGDATA
value: /var/lib/postgresql/data/pgdata
volumeMounts:
- name: postgres-storage
mountPath: /var/lib/postgresql/data
- name: init-db-script
mountPath: /docker-entrypoint-initdb.d
volumes:
- name: init-db-script
configMap:
name: postgres-init-script
volumeClaimTemplates:
- metadata:
name: postgres-storage
spec:
accessModes: [ "ReadWriteOnce" ]
storageClassName: {{ .Values.database.storage.storageClassName }}
resources:
requests:
storage: {{ .Values.database.storage.size }}
apiVersion: v1
kind: Service
metadata:
  name: {{ .Values.database.host }}
spec:
  type: ClusterIP
  selector:
    app: postgres-db
  ports:
    - name: postgres
      protocol: TCP
      port: 5432
      targetPort: 5432
    - name: metrics
      protocol: TCP
      port: 9187
      targetPort: 9187
app:
  replicaCount: 2
  image:
    repository: your-docker-id/mywebsite
    tag: "v1.2.0"
    pullPolicy: Always
  containerPort: 5000
  service:
    type: ClusterIP
    port: 80
    targetPort: 5000

database:
  image:
    repository: postgres
    tag: "15"
  user: admin
  db: mywebsite
  host: postgres-db-service
  storage:
    storageClassName: gp3
    size: 8Gi

objectNames:
  configMap: postgres-config
  secret: postgres-secret
Terraform (modules)
Terraform is my favorite tool for building, changing, and versioning infrastructure safely and efficiently.
I can write simple, human-readable code to define my (AWS) resources, and Terraform manages the entire lifecycle for me.
I am using 3 modules for terraform - vpc, eks and argocd.
This modular structure allows me to manage each on its own and makes it easier to manage, add and troubleshoot.
For a better view of the whole files and structure visit the following link: https://github.com/liormilliger/mywebsite-iac.git
AWS CLI Command
# List all S3 buckets in your account
aws s3 ls

# Create a new EC2 instance
aws ec2 run-instances \
    --image-id ami-0c55b159cbfafe1f0 \
    --count 1 \
    --instance-type t2.micro \
    --key-name MyKeyPair
Artifactory - Sample Configurations
Artifactory is a powerful tool for artifact management, supporting numerous clients and integrating with external components like databases and storage providers. Below are two primary configuration file examples.
1. system.yaml - High Availability Configuration
This YAML file is used to configure core Artifactory settings. The following example enables High Availability by defining a node identity and connecting to an external PostgreSQL database, which is a requirement for an HA cluster.
# artifactory/var/etc/system.yaml

# Shared configuration block for both Artifactory and Access services
shared:
  database:
    type: postgresql
    driver: org.postgresql.Driver
    url: jdbc:postgresql://your-postgres-host:5432/artifactory
    username: artifactory
    password: password

# Artifactory-specific configuration
artifactory:
  ha:
    enabled: true
    node:
      id: "art-node-01"      # Unique ID for this node
      ip: "192.168.1.101"     # Mock IP for this node
      taskAffinity: "any"   # Allows any node to run tasks
- Database Configuration: The
shared.databaseblock is critical for HA. All nodes in the cluster must point to the same external database to share state and metadata. - HA Enabled: The
ha.enabled: trueflag activates the high-availability mode for the node. - Node Identity: Each node in the cluster needs a unique
idand its ownipfor inter-node communication. - Task Affinity: The setting
taskAffinity: "any"is key for resilience. It allows background maintenance tasks to be executed by any available node in the cluster, ensuring that critical operations continue even if one node becomes unavailable.
2. binarystore.xml - S3 Sharded Filestore
This XML file configures a highly available and performant filestore by sharding binaries across multiple S3 backends. This method enhances I/O throughput and provides data redundancy.
<config version="2">
 <chain> <!-- template="s3-sharding" -->
        <provider id="cache-fs" type="cache-fs">
            <provider type="sharding" id="sharding">
                <sub-provider type="state-aware-s3" id="s3-shard1"/>
                <sub-provider type="state-aware-s3" id="s3-shard2"/>
            </provider>
        </provider>
    </chain>

   <provider id="sharding" type="sharding">
      <redundancy>2</redundancy>
   </provider>

   <provider id="s3-shard1" type="state-aware-s3">
      <endpoint>http://s3.amazonaws.com</endpoint>
      <bucketName>bucket1</bucketName>
      <path>path1</path>
      <region>us-east-1</region>
      <provider.id>aws-s3</provider.id>
      <identity>AK...-accessKeyId</identity>
      <credential>ePE...-secretAccessKey</credential>
      <enableSignedUrlRedirect>true</enableSignedUrlRedirect>
      <signedUrlExpirySeconds>3600</signedUrlExpirySeconds>
   </provider>

   <provider id="s3-shard2" type="state-aware-s3">
      <endpoint>http://s3.amazonaws.com</endpoint>
      <bucketName>bucket2</bucketName>
      <path>path2</path>
      <region>us-east-1</region>
      <provider.id>aws-s3</provider.id>
      <identity>AK...-accessKeyId</identity>
      <credential>ePE...-secretAccessKey</credential>
      <enableSignedUrlRedirect>true</enableSignedUrlRedirect>
      <signedUrlExpirySeconds>3600</signedUrlExpirySeconds>
   </provider>
</config>
- Provider Chain: The configuration uses a
cache-fsprovider to serve frequently accessed artifacts from a local cache, which then delegates to theshardingprovider for persistent storage. - Sharding and Redundancy: The
shardingprovider manages two underlying S3 providers (s3-shard1ands3-shard2). The<redundancy>2</redundancy>tag is the key to this configuration: it instructs Artifactory to write every uploaded artifact to both shards. This provides a complete, real-time backup of the data across two different S3 buckets. - State-Aware S3 Provider: The
state-aware-s3type is a specific S3 provider that helps maintain consistency between Artifactory's database and the S3 object store. Each provider points to a unique S3 bucket (bucket1,bucket2). - Signed URL Redirect: Setting
<enableSignedUrlRedirect>true</enableSignedUrlRedirect>offloads traffic from Artifactory. When a user requests a download, Artifactory generates a temporary, secure link directly to the S3 object and redirects the client, allowing the client to download directly from AWS. This significantly improves performance and scalability.
JFrog Xray
JFrog Xray is a universal software composition analysis (SCA) solution that helps you secure your software supply chain. Below, you can explore a sample security policy and a representative vulnerability scan for a common Docker image.
Understanding a Security Policy
This snippet defines an automated security rule for JFrog Xray.
// This is the main policy object.
{
  "name": "block-high-severity-vulns",
  "description": "Block download of artifacts with vulnerabilities rated High or above.",
  "type": "security",
  "rules": [
    {
      "name": "high-severity-rule",
      "criteria": {
        "min_severity": "High"
      },
      "actions": {
        "fail_build": true
      }
    }
  ]
}
- What it is: A security policy written in JSON that acts as an automated guard for your software components.
- What it does: It instructs Xray to automatically fail the build process if any component has a vulnerability rated "High" or worse.
- Why it matters: This enforces a "shift-left" security model by catching critical issues early in development, preventing vulnerable code from ever reaching production.
Image: python:3.9-slim
Summary: This section displays a sample vulnerability report for the `python:3.9-slim` Docker image.
Vulnerability Details
🔴 High Severity Vulnerabilities
| Package | Vulnerability ID | CVSS Score |
|---|---|---|
libssl1.1 |
CVE-2023-3817 | 7.4 |
libexpat1 |
CVE-2022-43680 | 8.8 |
🟠 Medium Severity Vulnerabilities
| Package | Vulnerability ID | CVSS Score |
|---|---|---|
ncurses-base |
CVE-2022-29458 | 6.8 |
apt |
CVE-2021-33624 | 5.9 |
- Key Takeaway: Most vulnerabilities discovered are not in the Python code itself, but in the underlying Debian operating system packages (like `libssl`) that the image is built upon.
- What it shows: The report highlights specific security issues (identified by their CVE numbers), categorizes them by severity, and provides a CVSS score to measure their potential impact.
AWS CLI Command
# List all S3 buckets in your account
aws s3 ls

# Create a new EC2 instance
aws ec2 run-instances \
    --image-id ami-0c55b159cbfafe1f0 \
    --count 1 \
    --instance-type t2.micro \
    --key-name MyKeyPair
Prometheus
Prometheus is a very strong monitoring tool that uses a Service Monitor yaml file to scrape metrics from the cluster:
# servicemonitor.yaml
apiVersion: monitoring.coreos.com/v1
kind: ServiceMonitor
metadata:
  name: mywebsite-servicemonitor
  # Deploy this ServiceMonitor in the SAME namespace as your application
  namespace: default
  labels:
    # IMPORTANT: This label tells the Prometheus instance from the stack to discover this ServiceMonitor.
    # By default, it looks for 'release: prometheus'.
    release: prometheus
spec:
  # This section selects the Service(s) to monitor.
  selector:
    matchLabels:
      # This MUST match the label on your application's Service.
      app: mywebsite
  # This tells the ServiceMonitor to look for the Service in the 'default' namespace.
  namespaceSelector:
    matchNames:
      - default
  # This section defines the endpoint to scrape on the selected Service.
  endpoints:
    - port: web # This must match the NAME of the port in your Service definition.
      path: /metrics # The path where your app exposes Prometheus metrics.
      interval: 15s # How frequently to scrape metrics.
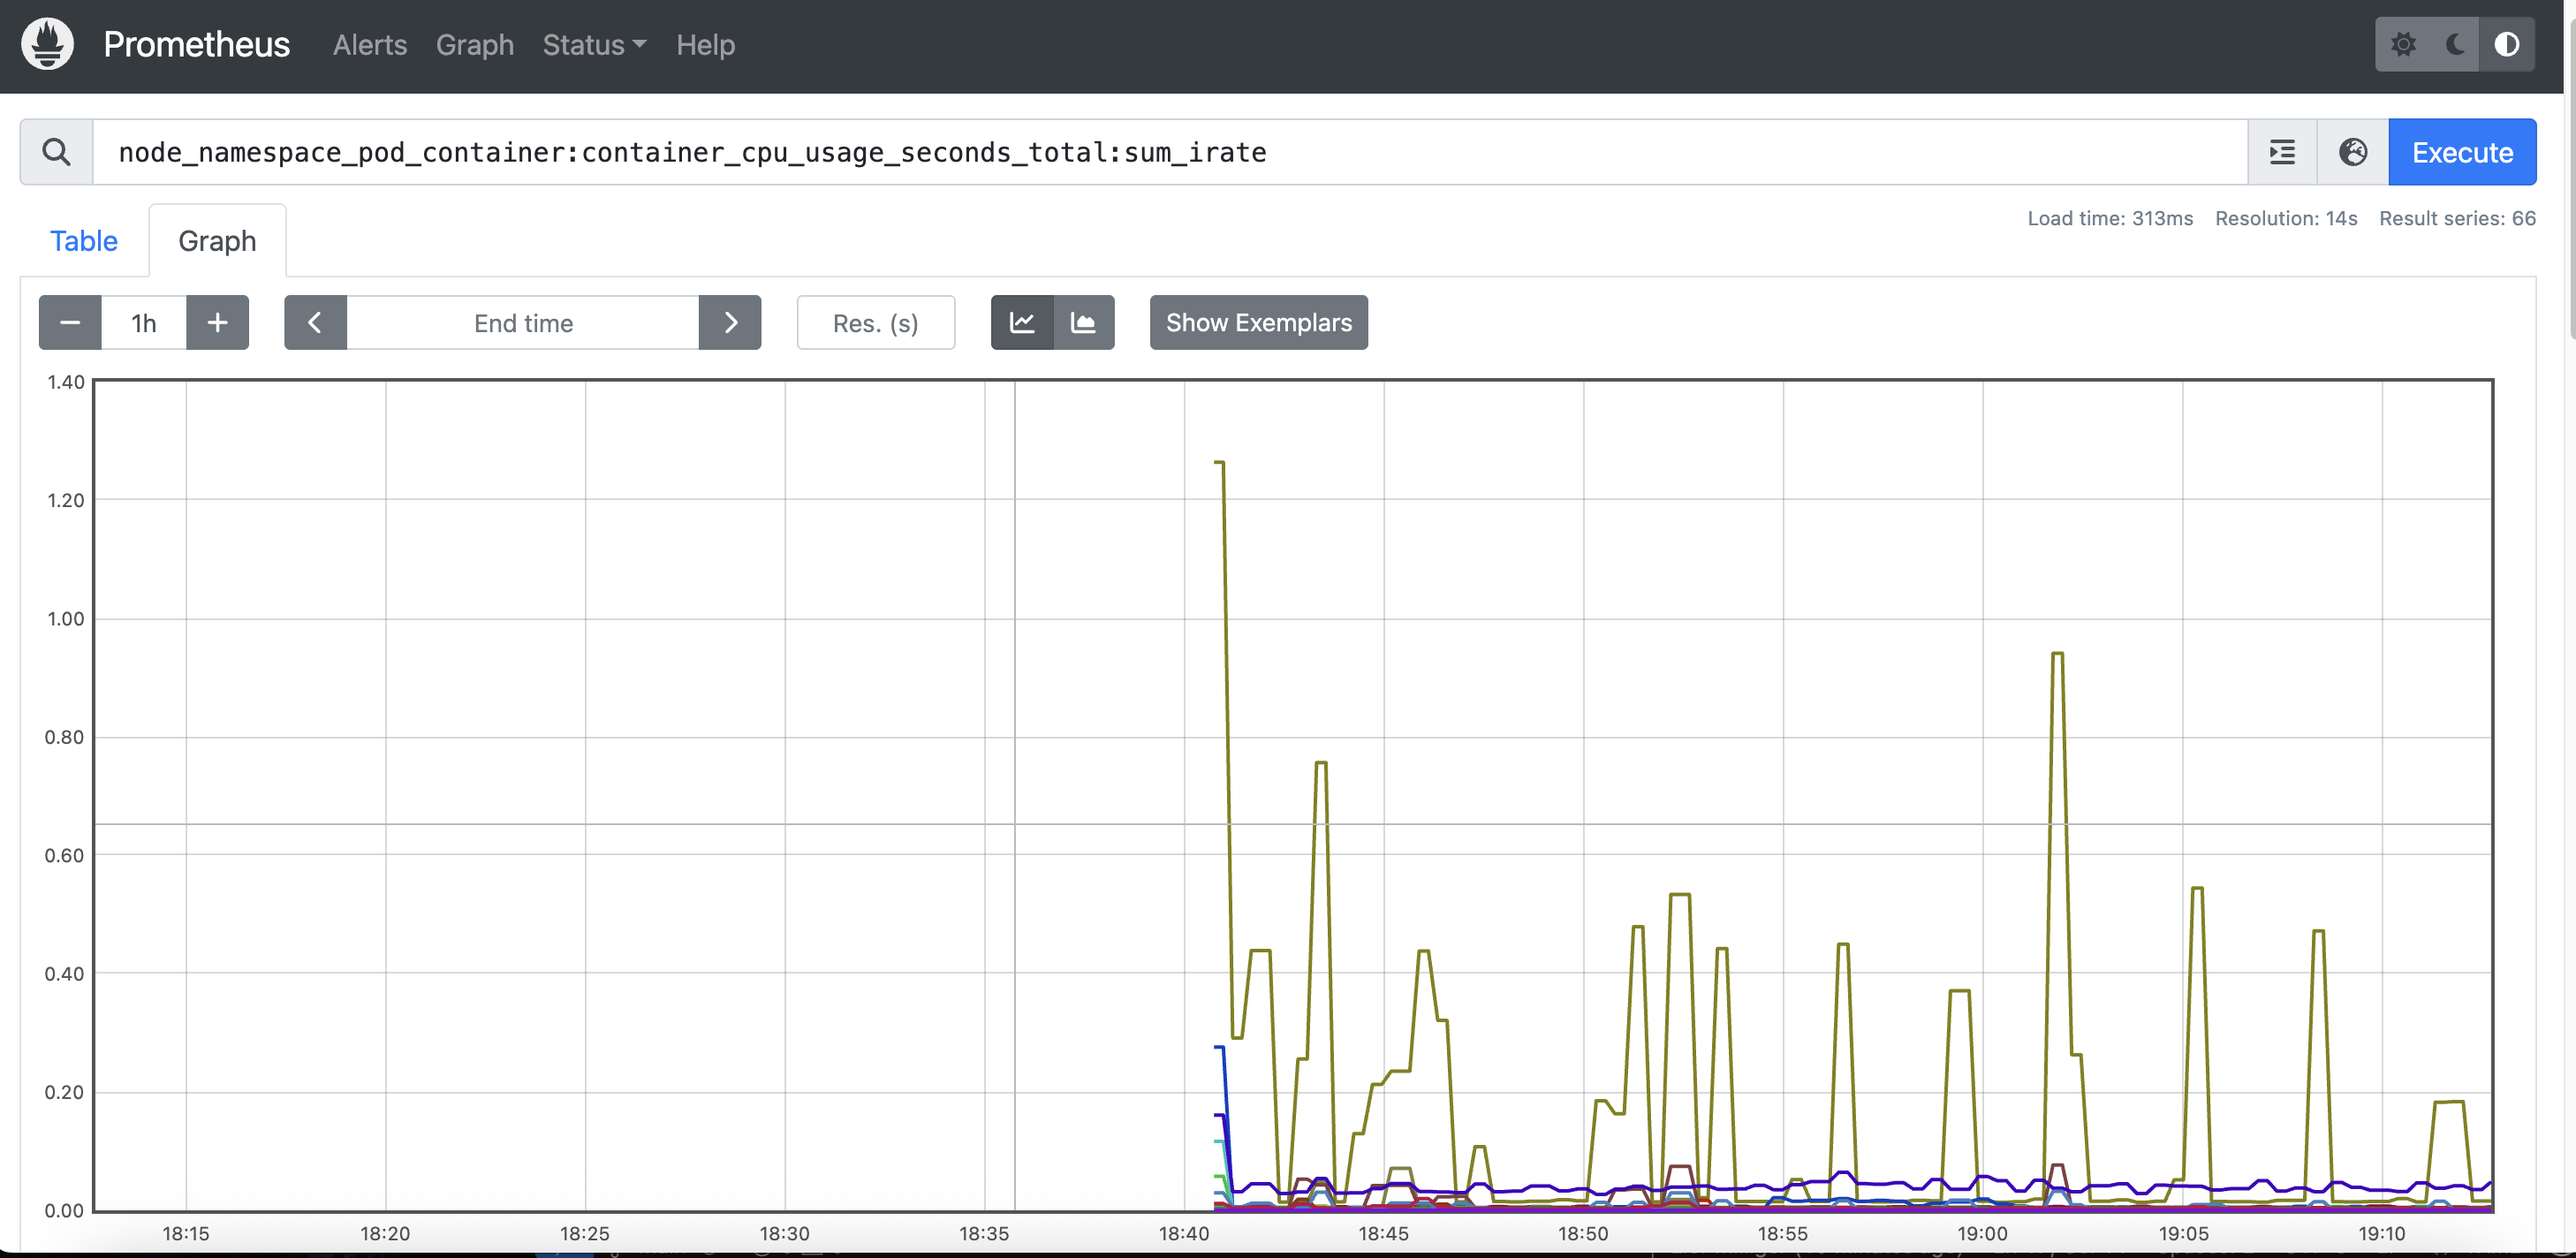
We can expose the UI by port forwarding its service, and use the PromQL to get data such as CPU usage of pods per node:
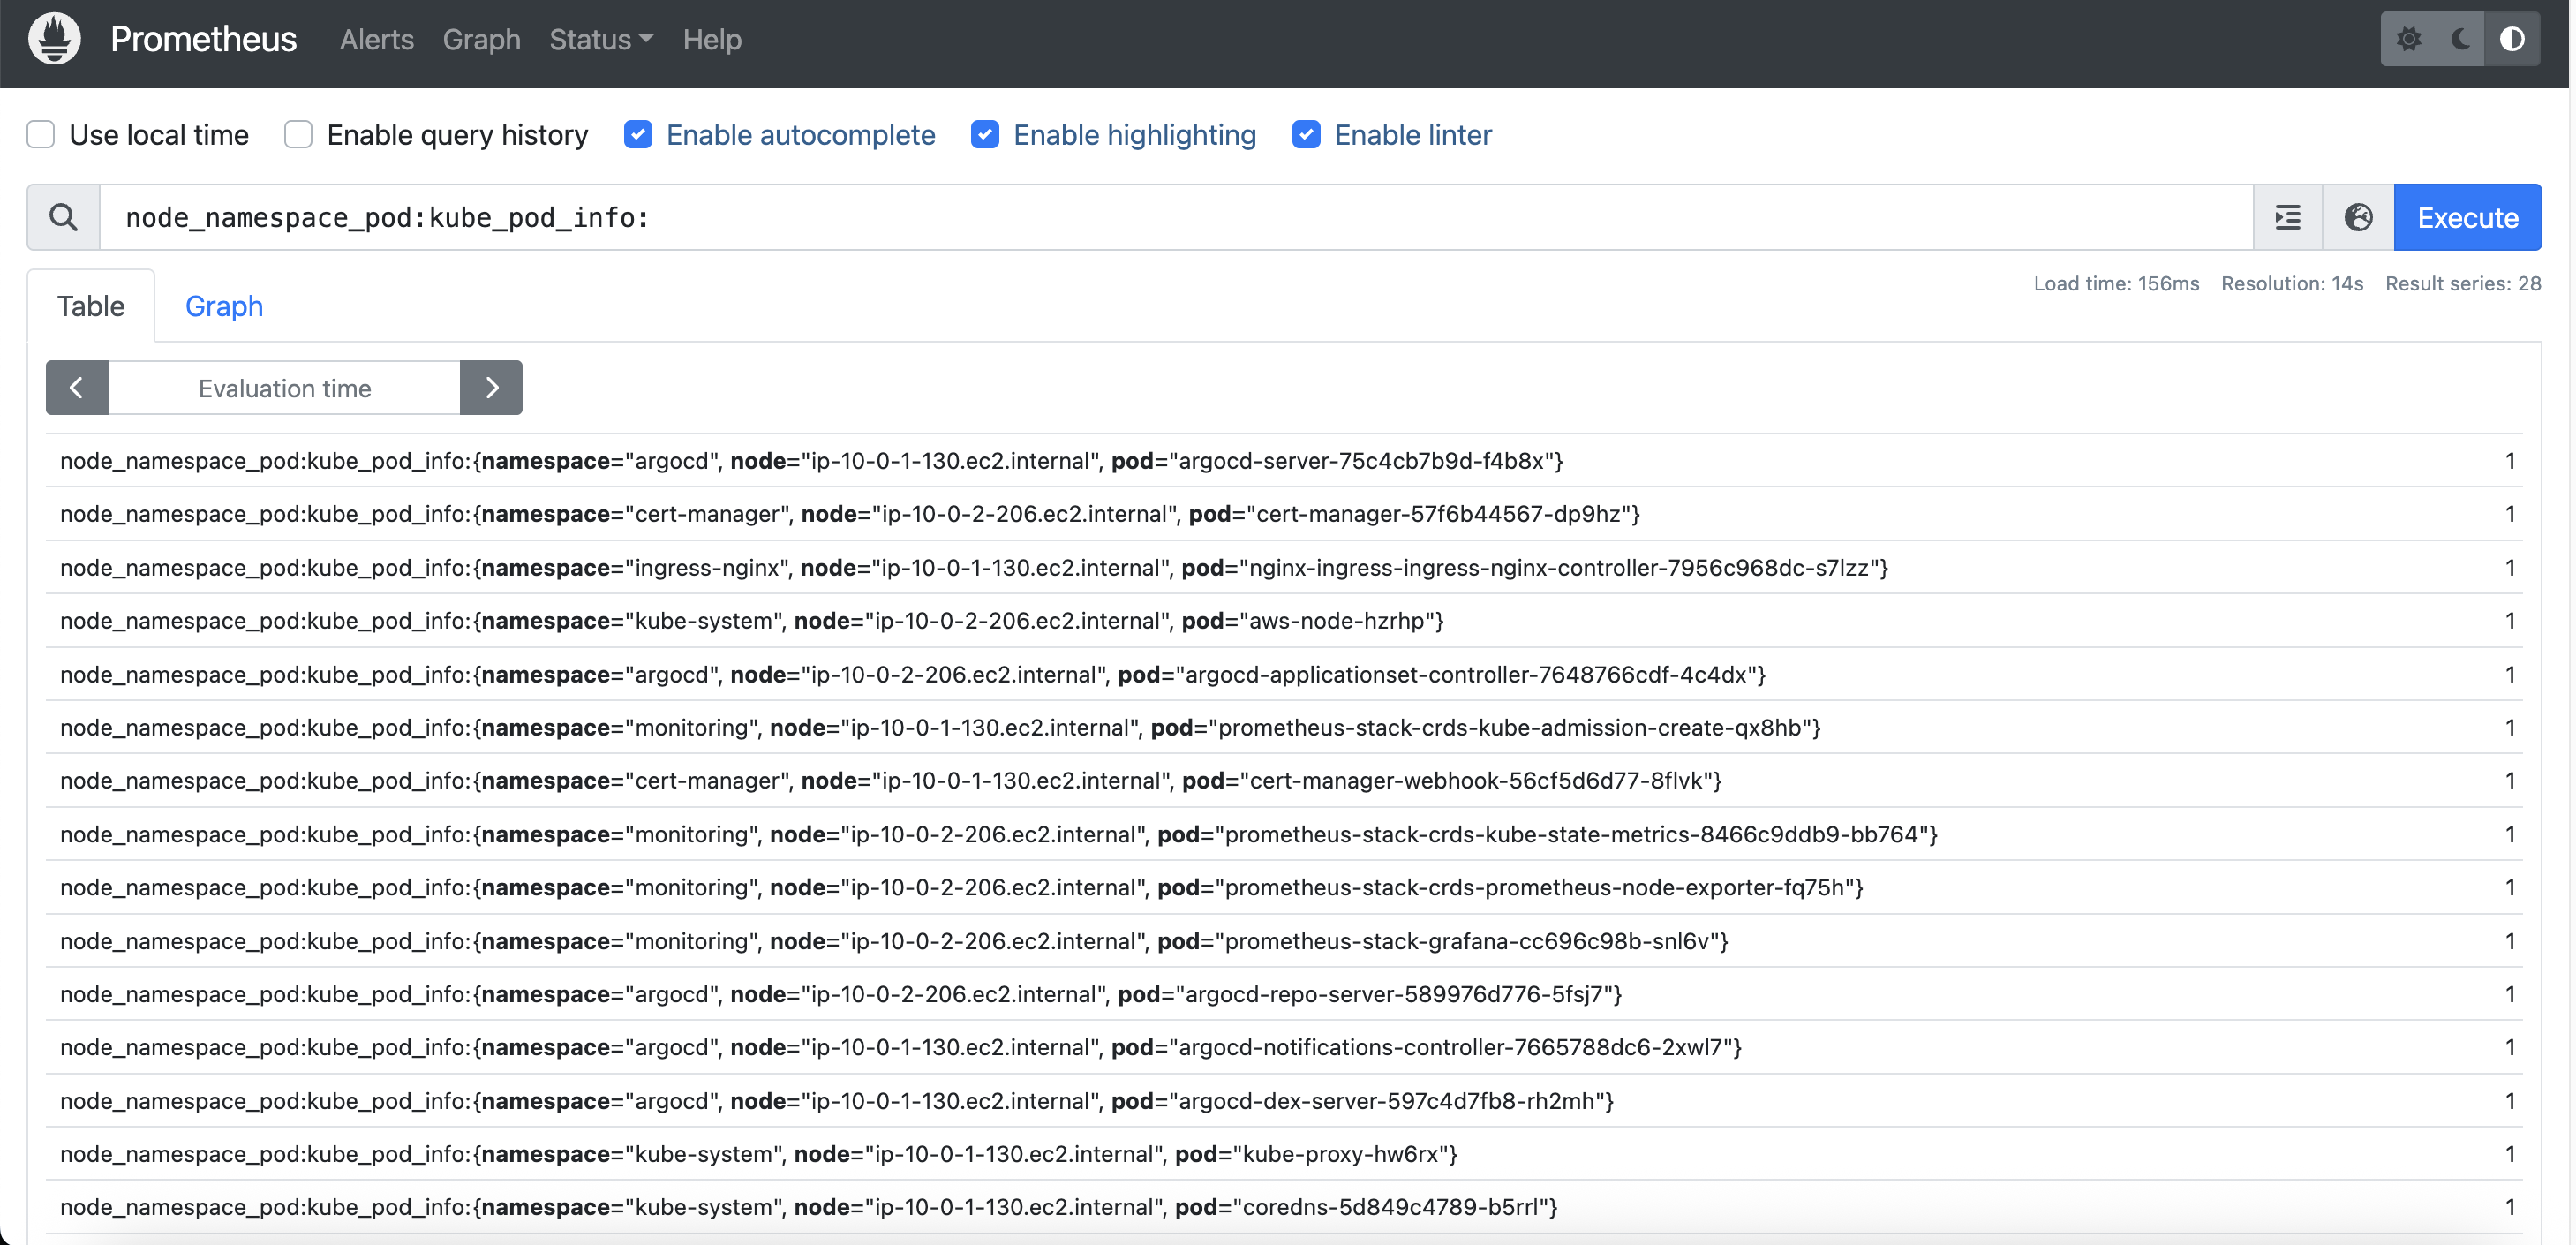
And we can also get the list of all pods by namespace and node:
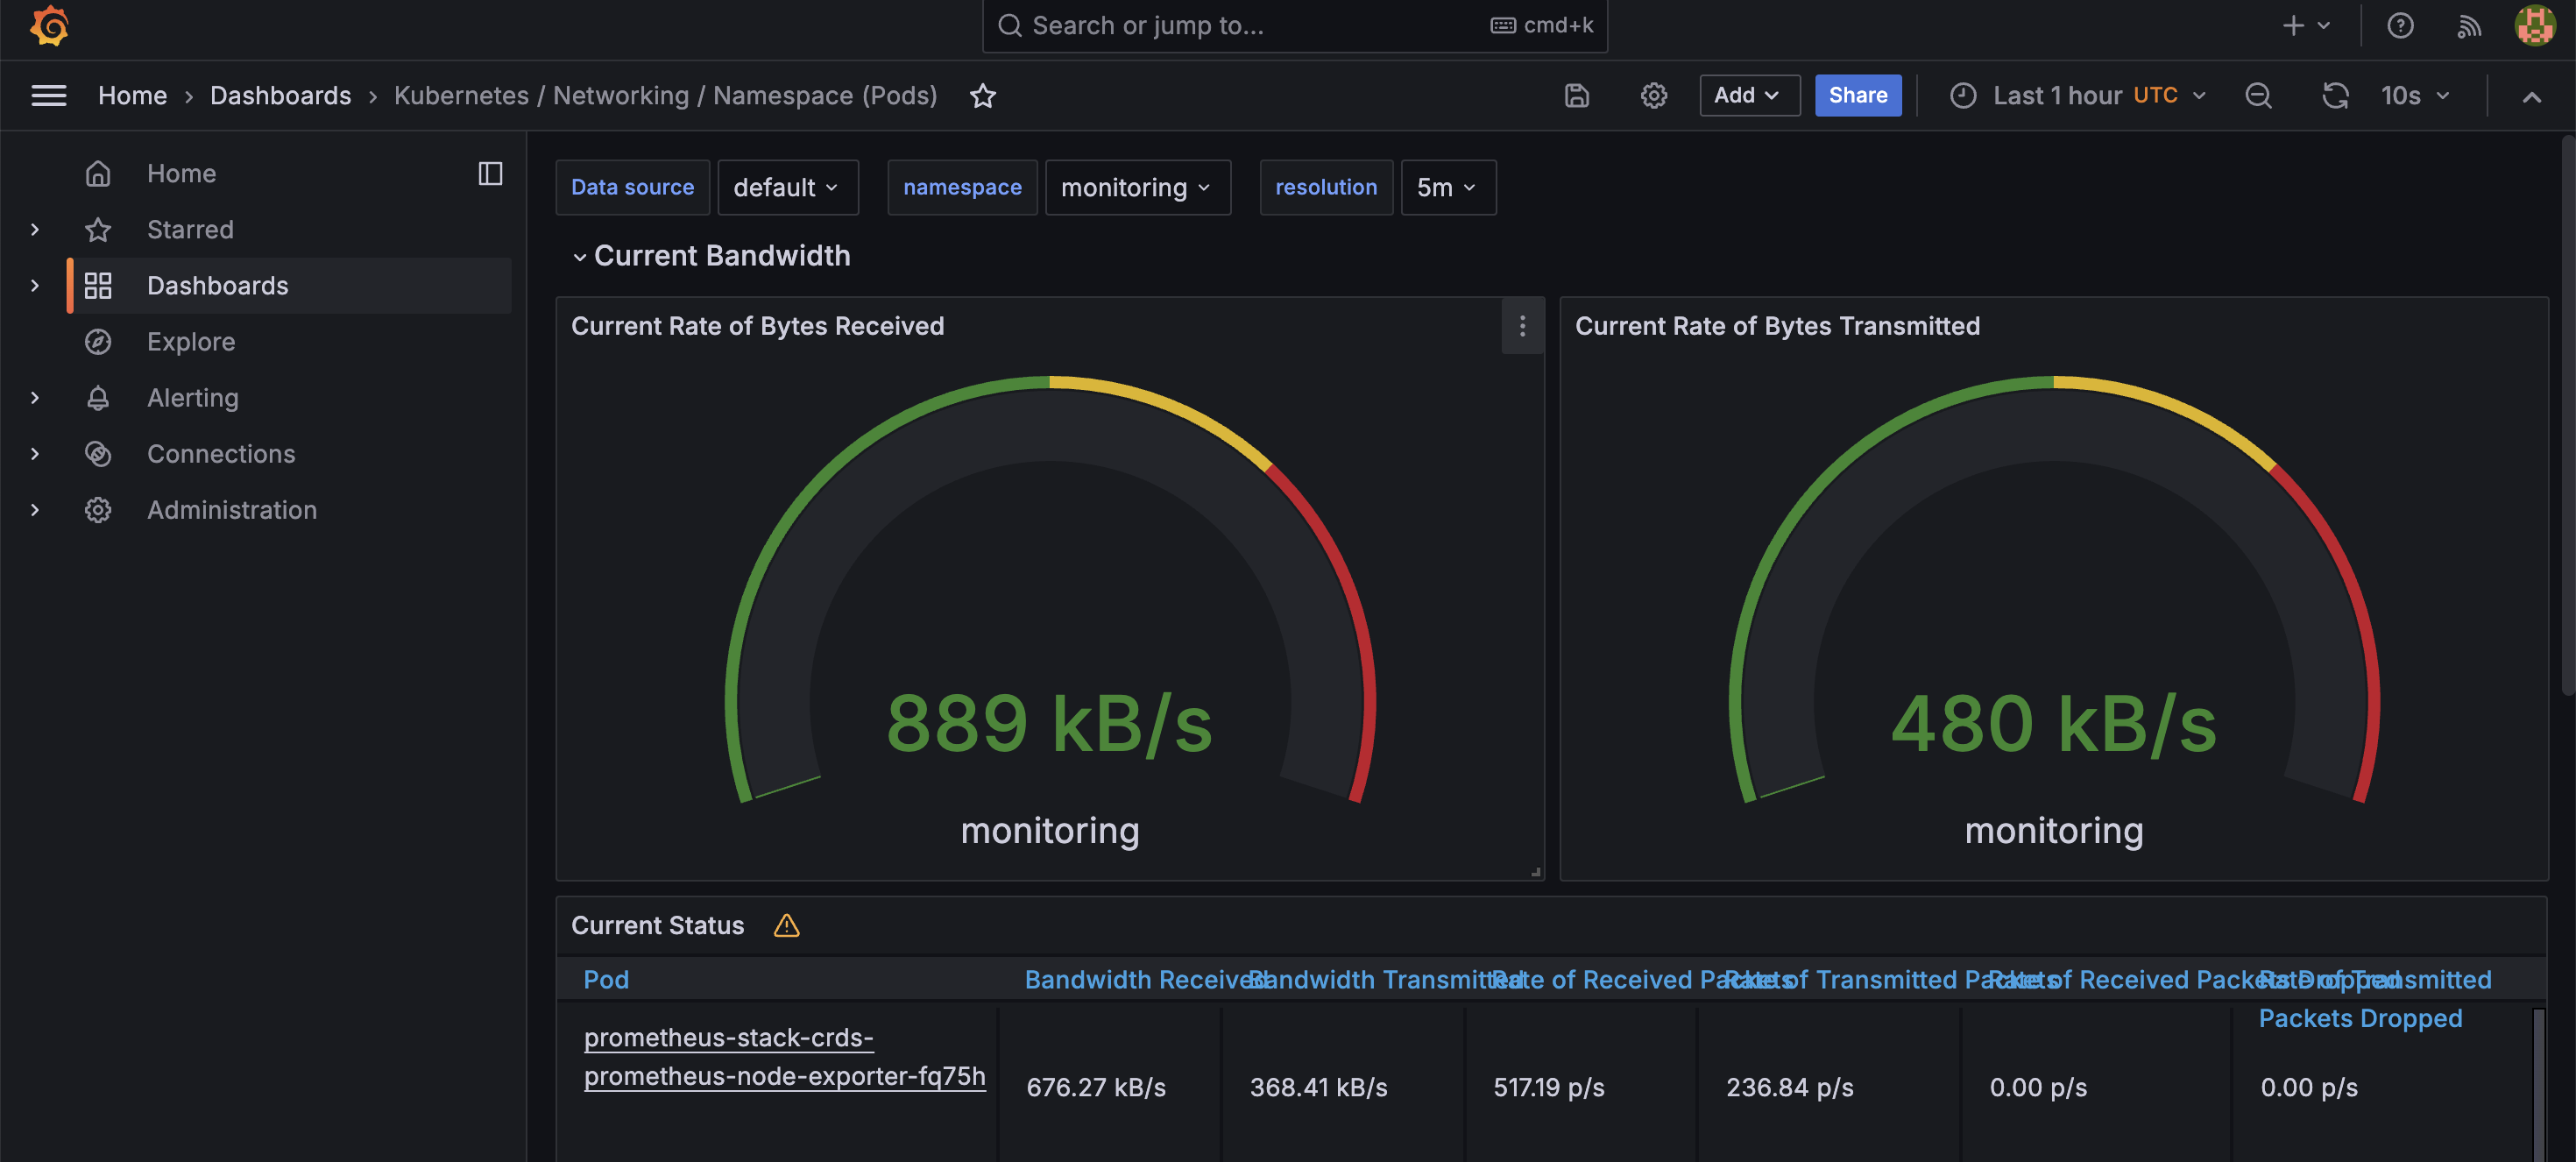
Grafana for Observability
I use Grafana as part of the Prometheus stack, as it provides visualization to the Prometheus Metrics (Observability). Grafana uses Dashboards and transfers the Prometheus scrapings and PromQL to present system metrics in a visualized manner, such as gauges, graphs and more, in real time.
Visualizations in Action
Metrics can be displayed in various formats for a quick, real-time status check. For example, gauges are great for showing current network bandwidth:
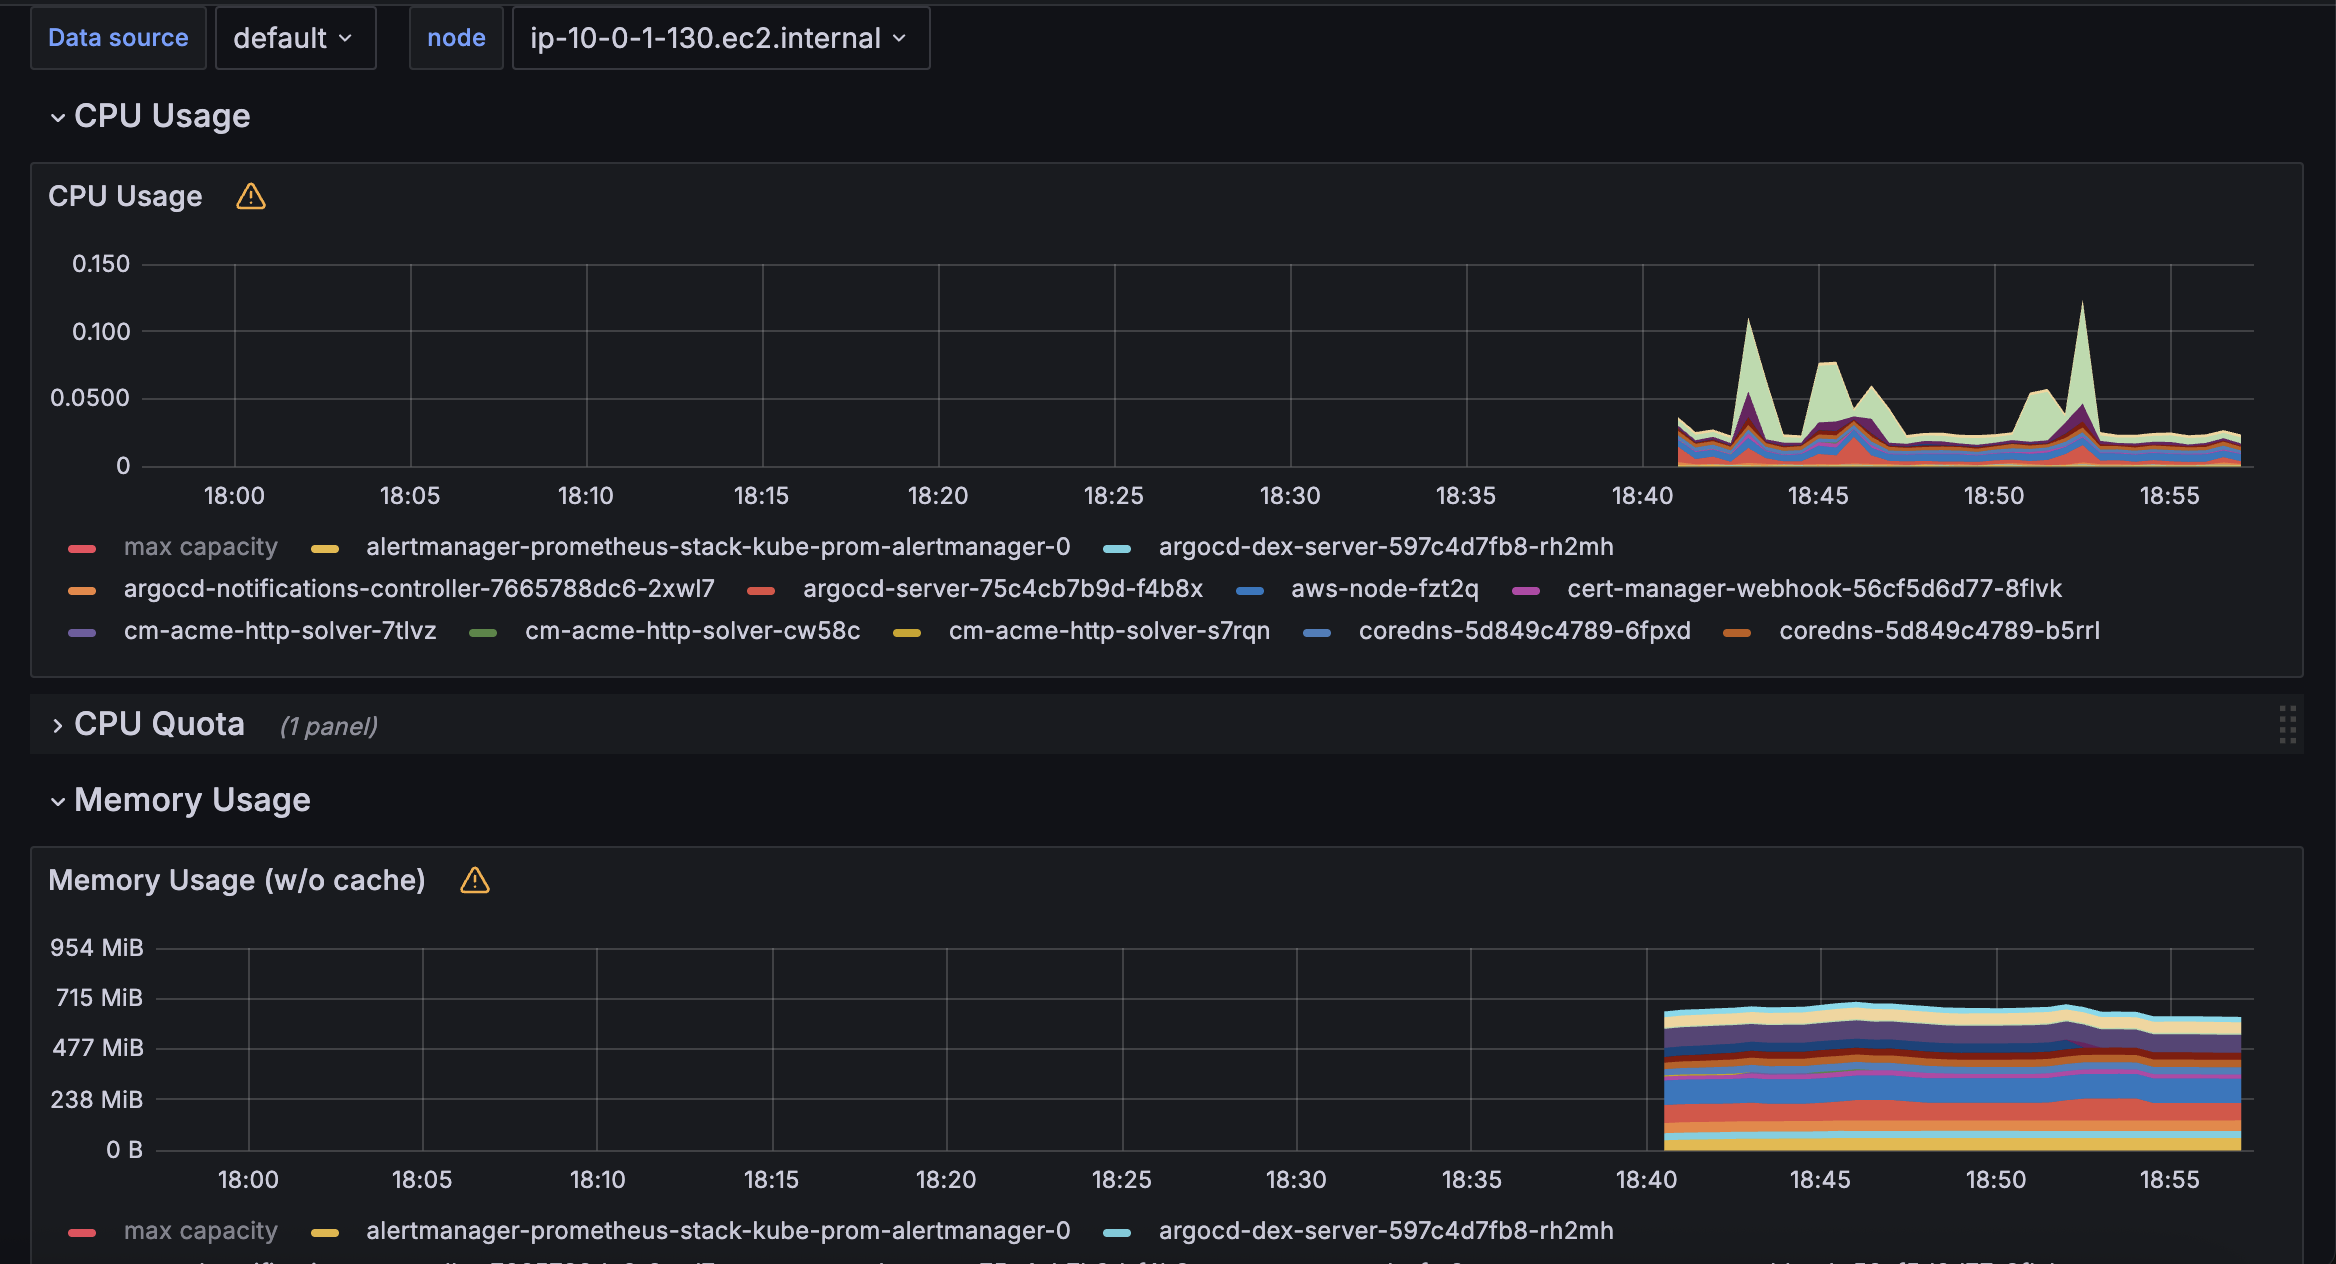
Time-series graphs are perfect for visualizing resource usage over time for different services in a Kubernetes cluster:
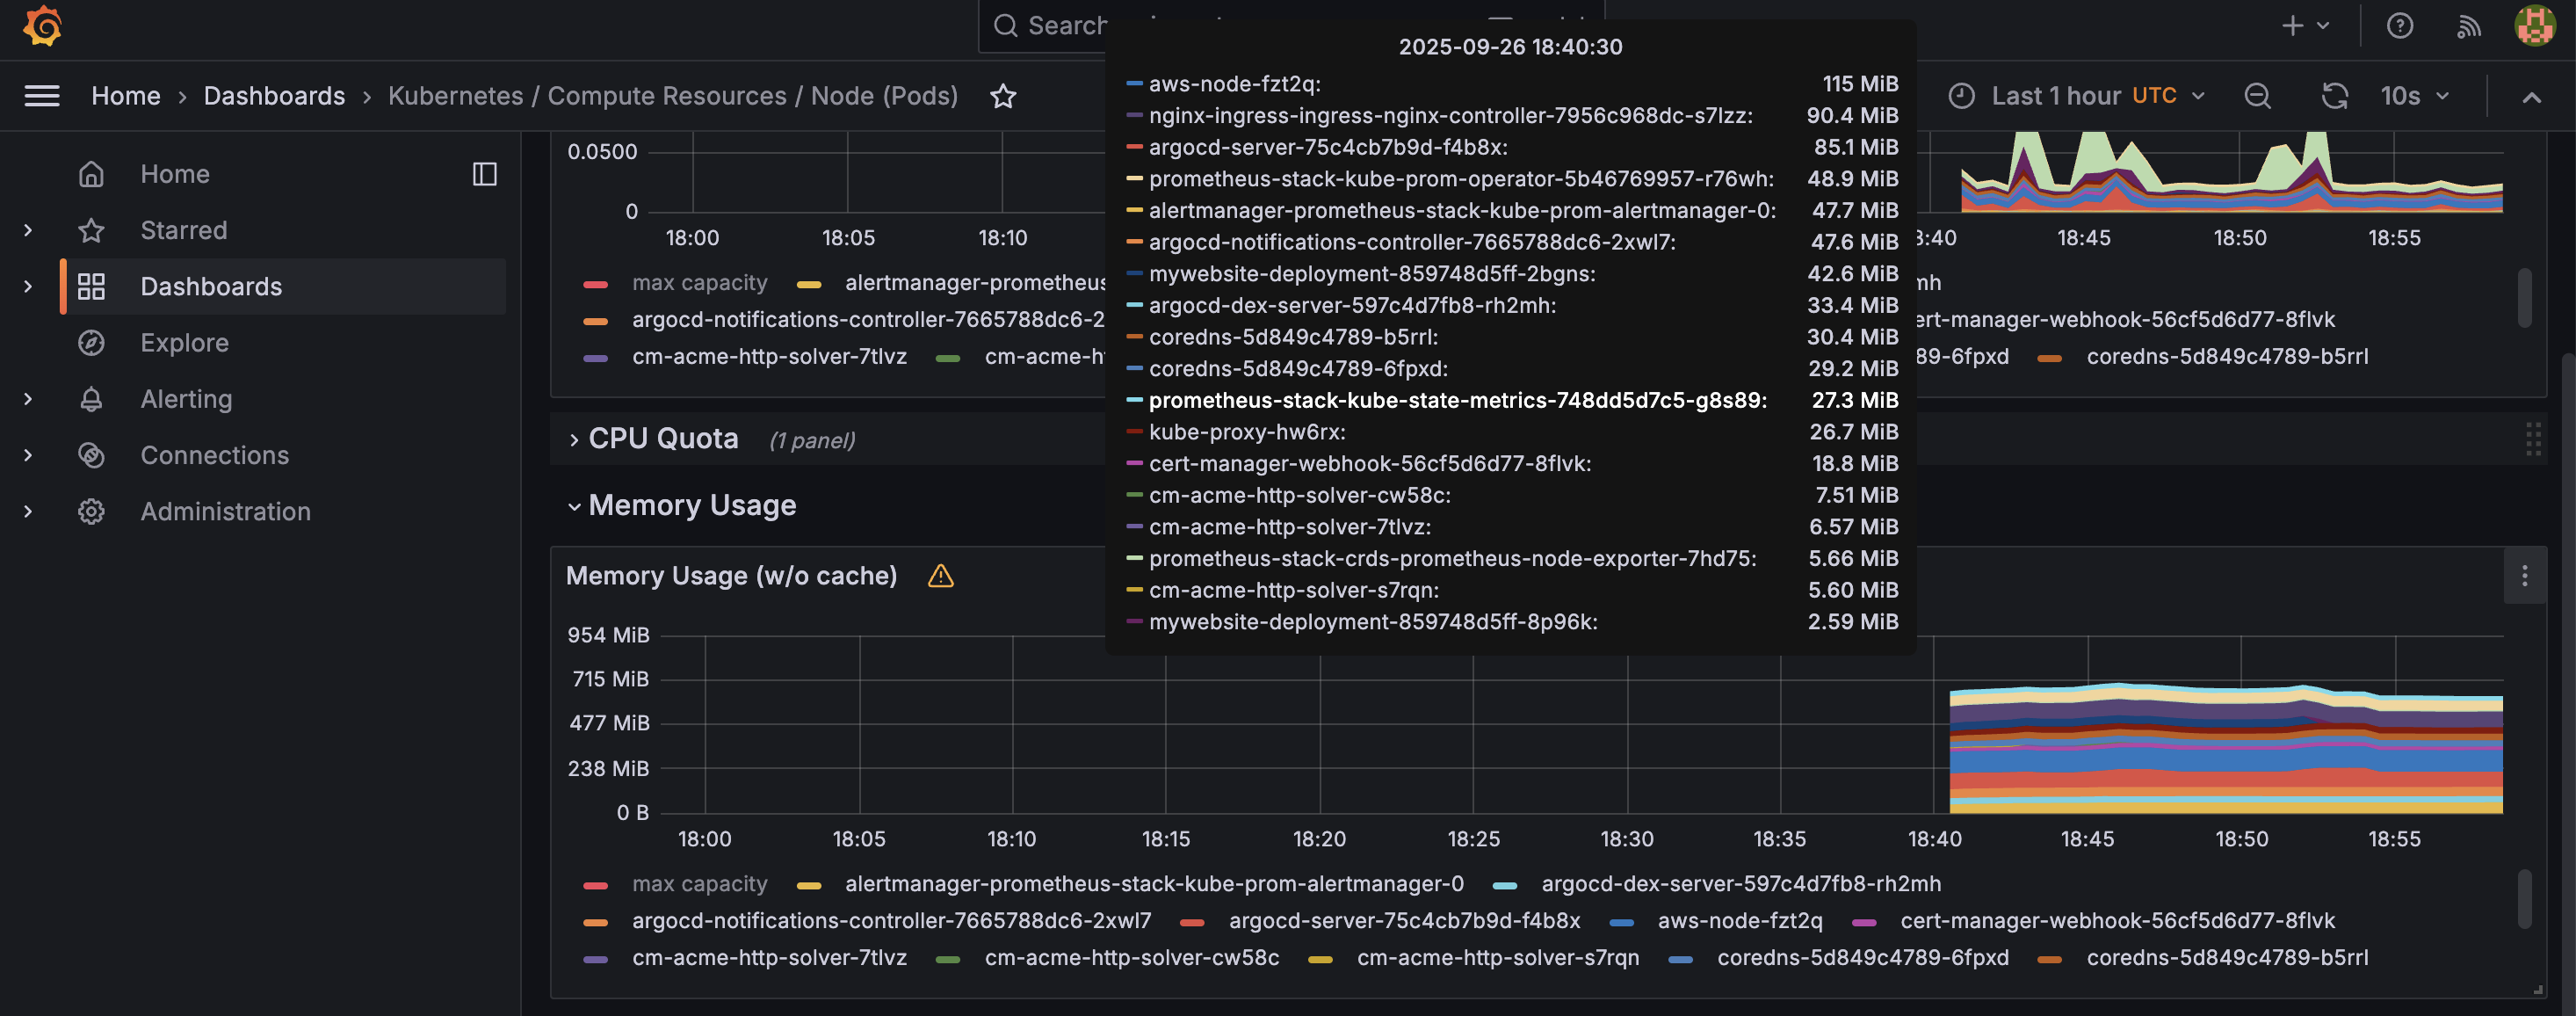
You can also get a detailed breakdown of resource consumption by each component (pod) directly from the dashboard:
Grafana & PromQL
Grafana is a visualization tool that builds upon data sources like Prometheus. Panels are built using queries written in PromQL (Prometheus Query Language). Here is a sample query to calculate and show CPU usage:
100 - (avg by (instance) (rate(node_cpu_seconds_total{mode="idle"}[5m])) * 100)Python: From a Simple App to a Database-Driven Service
I started with a simple Flask application, `app.py`, designed to serve the pages of this website. As the project grew, I wanted to keep a record of visits, which led me to integrate a PostgreSQL database. This seemingly small addition had a significant impact on the architecture. It required separating the database logic into `db.py` and adjusting how the application was configured for different environments. This evolution turned a single-file app into a multi-service architecture, affecting local development, containerization with Docker, and deployment on Kubernetes, as each layer needed specific adjustments to handle the new database dependency.
Below you can see the full code I am using for this application, both in PROD and DEV environments.
from flask import Flask, render_template, send_from_directory, request
from prometheus_flask_exporter import PrometheusMetrics
import os
import logging
import time
from db import init_db_command, log_visitor, get_db

app = Flask(__name__)

# --- Database Setup ---
# Close the database connection after each request and add a CLI command.
app.teardown_appcontext(lambda e: get_db().close())
app.cli.add_command(init_db_command)


# --- Prometheus Metrics Configuration ---
metrics = PrometheusMetrics(app)
metrics.info('app_info', 'Application info', version='1.0.3')


# --- Logging Configuration ---
handler = logging.StreamHandler()
formatter = logging.Formatter(
    '%(asctime)s UTC [%(levelname)s] - %(message)s'
)
formatter.converter = time.gmtime
handler.setFormatter(formatter)
app.logger.addHandler(handler)
app.logger.setLevel(logging.INFO)

# --- Middleware to Log Every Visit ---
@app.before_request
def log_request_info():
    """
    This function runs before every request to log the visitor's information.
    """
    # We don't want to log requests for static files (css, js, images)
    if not request.path.startswith('/static'):
        log_visitor()


# --- Application Routes ---

@app.route('/')
def home():
    app.logger.info(f"[{request.path}] - Home page accessed.")
    return render_template('index.html')

@app.route('/tech-in-action')
def tech():
    app.logger.info(f"[{request.path}] - Tech in Action page accessed.")
    return render_template('tech.html')

# ... other routes ...

if __name__ == '__main__':
    app.run(host='0.0.0.0', port=5000)
import os
import psycopg2
from flask import g, request, current_app
import click

def get_db():
    """
    Opens a new database connection if there is none yet for the
    current application context.
    """
    if 'db' not in g:
        try:
            g.db = psycopg2.connect(
                # Use environment variables for connection details
                host=os.environ.get('POSTGRES_HOST', 'db'),
                dbname=os.environ.get('POSTGRES_DB', 'mywebsite'),
                user=os.environ.get('POSTGRES_USER', 'admin'),
                password=os.environ.get('POSTGRES_PASSWORD', 'password'),
                port=os.environ.get('POSTGRES_PORT', 5432)
            )
            current_app.logger.info("Database connection established.")
        except psycopg2.OperationalError as e:
            current_app.logger.error(f"Could not connect to database: {e}")
            return None
    return g.db

def log_visitor():
    """
    Logs the current visitor's IP, user agent, and the page they visited.
    """
    db = get_db()
    if db is None:
        current_app.logger.error("No database connection available, skipping visitor log.")
        return

    cursor = db.cursor()
    visitor_ip = request.headers.get('X-Forwarded-For', request.remote_addr)
    user_agent = request.headers.get('User-Agent')
    page_route = request.path

    try:
        cursor.execute(
            """
            INSERT INTO visitors (ip_address, user_agent) VALUES (%s, %s)
            ON CONFLICT (ip_address) DO UPDATE
            SET last_visit_time = NOW(), user_agent = EXCLUDED.user_agent;
            """,
            (visitor_ip, user_agent)
        )
        cursor.execute(
            """
            INSERT INTO page_views (visitor_ip, page_route) VALUES (%s, %s);
            """,
            (visitor_ip, page_route)
        )
        db.commit()
    except Exception as e:
        db.rollback()
        current_app.logger.error(f"Database error: {e}")
    finally:
        cursor.close()

@click.command('init-db')
def init_db_command():
    """Clear existing data and create new tables."""
    db = get_db()
    with current_app.open_resource('../init/init.sql') as f:
        db.cursor().execute(f.read().decode('utf8'))
    db.commit()
    click.echo('Initialized the database.')
from flask import Flask, render_template, send_from_directory, request
from prometheus_flask_exporter import PrometheusMetrics
import os
import logging
import time

app = Flask(__name__)

# --- Prometheus Metrics and Logging are kept for consistency ---
metrics = PrometheusMetrics(app)
metrics.info('app_info', 'Application info', version='1.0.3')

handler = logging.StreamHandler()
formatter = logging.Formatter(
    '%(asctime)s UTC [%(levelname)s] - %(message)s'
)
formatter.converter = time.gmtime
handler.setFormatter(formatter)
app.logger.addHandler(handler)
app.logger.setLevel(logging.INFO)


# --- Application Routes ---
# All database-related calls are removed from this version.

@app.route('/')
def home():
    app.logger.info(f"[{request.path}] - Home page accessed.")
    return render_template('index.html')

@app.route('/about-me')
def about():
    app.logger.info(f"[{request.path}] - About Me page accessed.")
    return render_template('about.html')

# ... other routes are identical to app.py ...

if __name__ == '__main__':
    app.run(host='0.0.0.0', port=5000)
Bash: Automating SSL Certificates with Docker Compose and Certbot
This Bash script automates the entire process of obtaining and installing a free SSL/TLS certificate from Let's Encrypt for a web server running inside Docker. It is designed to work with a Docker Compose setup that includes an Nginx web server and a Certbot container.
- Automation: The script handles everything from creating temporary certificates to allow Nginx to start, to requesting the real certificate from Let's Encrypt, and finally reloading Nginx to apply it.
- Docker Integration: It seamlessly manages the Docker containers, starting, stopping, and executing commands within them as needed for the certification process.
- Best Practices: The script downloads recommended TLS security parameters and automates the certificate renewal process setup, ensuring a secure and up-to-date configuration.
init-letsencrypt.sh
#!/bin/bash

# Make sure to replace these with your domain and email
domains=(your-domain.com)
email="your-email@example.com" # Add a valid email address

# --- Do not edit below this line ---
data_path="./data/certbot"
rsa_key_size=4096
staging=0 # Set to 1 for testing with staging servers

if [ -d "$data_path" ]; then
  read -p "Existing data found for $domains. Continue and replace existing certificate? (y/N) " decision
  if [ "$decision" != "Y" ] && [ "$decision" != "y" ]; then
    exit
  fi
fi

if [ ! -e "$data_path/conf/options-ssl-nginx.conf" ] || [ ! -e "$data_path/conf/ssl-dhparams.pem" ]; then
  echo "### Downloading recommended TLS parameters ..."
  mkdir -p "$data_path/conf"
  curl -s https://raw.githubusercontent.com/certbot/certbot/master/certbot-nginx/certbot_nginx/_internal/tls_configs/options-ssl-nginx.conf > "$data_path/conf/options-ssl-nginx.conf"
  curl -s https://raw.githubusercontent.com/certbot/certbot/master/certbot/certbot/ssl-dhparams.pem > "$data_path/conf/ssl-dhparams.pem"
  echo
fi

echo "### Creating dummy certificate for $domains ..."
path="/etc/letsencrypt/live/$domains"
mkdir -p "$data_path/conf/live/$domains"
docker-compose run --rm --entrypoint "\
  openssl req -x509 -nodes -newkey rsa:$rsa_key_size -days 1\
    -keyout '$path/privkey.pem' \
    -out '$path/fullchain.pem' \
    -subj '/CN=localhost'" certbot
echo

echo "### Starting nginx ..."
docker-compose up --force-recreate -d nginx
echo

echo "### Deleting dummy certificate for $domains ..."
docker-compose run --rm --entrypoint "\
  rm -Rf /etc/letsencrypt/live/$domains && \
  rm -Rf /etc/letsencrypt/archive/$domains && \
  rm -Rf /etc/letsencrypt/renewal/$domains.conf" certbot
echo

echo "### Requesting Let's Encrypt certificate for $domains ..."
domain_args=""
for domain in "${domains[@]}"; do
  domain_args="$domain_args -d $domain"
done

email_arg="--email $email"
case "$email" in
  "") email_arg="--register-unsafely-without-email" ;;
esac

if [ $staging != "0" ]; then staging_arg="--staging"; fi

docker-compose run --rm --entrypoint "\
  certbot certonly --webroot -w /var/www/certbot \
    $staging_arg \
    $email_arg \
    $domain_args \
    --rsa-key-size $rsa_key_size \
    --agree-tos \
    --force-renewal" certbot
echo

echo "### Reloading nginx ..."
docker-compose exec nginx nginx -s reload

echo "### Your site is now running with HTTPS! ###"
Script Breakdown
This script is executed in several distinct stages to ensure a smooth and automated setup:
- Configuration: At the top, you define the domain(s) you want to secure and a contact email address. This makes the script easy to adapt for different projects.
- Download TLS Parameters: The script checks if secure TLS parameters from Certbot's official repository exist. If not, it downloads them. These files provide strong, up-to-date SSL/TLS settings for Nginx.
- Create a Dummy Certificate: Nginx won't start if it's configured for HTTPS but can't find an SSL certificate. To solve this chicken-and-egg problem, the script generates a temporary, self-signed "dummy" certificate.
- Start Nginx: With the dummy certificate in place, the script starts the Nginx container. Nginx can now run and is ready to serve the validation files that Let's Encrypt needs to see.
- Request the Real Certificate: The script then deletes the dummy certificate and runs the Certbot container. Certbot communicates with Let's Encrypt's servers, which perform an HTTP-01 challenge to verify that you control the domain. Once verified, Let's Encrypt issues a real certificate.
- Reload Nginx: Finally, the script sends a reload command to the running Nginx container. This causes Nginx to gracefully pick up the new, official Let's Encrypt certificate without any downtime, completing the switch to HTTPS.
My experience with databases is being showcased here with PostgreSQL, as this is my favorite Relational DB. I decided to enhance my portfolio application by creating a logic that writes all visitor traffic to a database to track their navigation. I created 2 tables for that and the results were surprising!
This required changes to the app logic and the creation of a db.py file—both of which are presented in the Python and Bash Scripting snippets on this page.
Database Initialization
The database itself needs an initialization script to create the necessary schema, user, password, and tables before the application can interact with it.
-- init.sql

-- This script creates a schema to log website traffic, tracking unique
-- visitors and the specific pages they view over time.

-- Table to store unique visitor information.
-- The IP address is the primary key here, as it uniquely identifies a visitor.
CREATE TABLE IF NOT EXISTS visitors (
    ip_address INET PRIMARY KEY,
    first_visit_time TIMESTAMPTZ NOT NULL DEFAULT NOW(),
    last_visit_time TIMESTAMPTZ NOT NULL DEFAULT NOW(),
    user_agent TEXT -- Optional: store browser/device info
);

-- Table to log each individual page view.
-- This table has its own primary key (view_id) because a visitor can have many page views.
-- It uses a foreign key to link back to the visitors table.
CREATE TABLE IF NOT EXISTS page_views (
    view_id SERIAL PRIMARY KEY,
    visitor_ip INET NOT NULL,
    page_route TEXT NOT NULL, -- e.g., '/', '/about-me', '/tech-in-action'
    view_timestamp TIMESTAMPTZ NOT NULL DEFAULT NOW(),
    CONSTRAINT fk_visitor_ip
        FOREIGN KEY(visitor_ip)
        REFERENCES visitors(ip_address)
        ON DELETE CASCADE -- If a visitor is deleted, their page views are also deleted.
);
This SQL script sets up two core tables:
visitors: This table stores a unique record for each visitor based on their IP address. It tracks their first and most recent visit times.page_views: This table logs every single page a visitor accesses. Each entry is linked back to the visitor's IP in thevisitorstable, creating a complete history of user navigation.
Real-World Results
When launching my app with the database using a dedicated docker-compose file on an EC2 instance and opening the HTTP port to all traffic, I asked some friends to try it out. Afterward, I queried the database to see the records.
I was stunned to see the following traffic, which includes all 148 requests from the attacking IP address:
 view_id |   visitor_ip    | page_route                                        | view_timestamp
---------+-----------------+---------------------------------------------------+-------------------------------
...
      23 | 40.113.19.56    | /wp-content/plugins/hellopress/wp_filemanager.php | 2025-10-03 15:08:44.890954+00
      24 | 40.113.19.56    | /bp.php                                           | 2025-10-03 15:08:44.981685+00
      25 | 40.113.19.56    | /file2.php                                        | 2025-10-03 15:08:45.069474+00
      26 | 40.113.19.56    | /class.1.php                                      | 2025-10-03 15:08:45.155711+00
      27 | 40.113.19.56    | /manager.php                                      | 2025-10-03 15:08:45.241398+00
      28 | 40.113.19.56    | /file21.php                                       | 2025-10-03 15:08:45.326693+00
      29 | 40.113.19.56    | /file6.php                                        | 2025-10-03 15:08:45.413621+00
      30 | 40.113.19.56    | /file.php                                         | 2025-10-03 15:08:45.500576+00
      31 | 40.113.19.56    | /lock360.php                                      | 2025-10-03 15:08:45.586863+00
      32 | 40.113.19.56    | /default.php                                      | 2025-10-03 15:08:45.679053+00
      33 | 40.113.19.56    | /file5.php                                        | 2025-10-03 15:08:45.794394+00
      34 | 40.113.19.56    | /333.php                                          | 2025-10-03 15:08:45.881608+00
      35 | 40.113.19.56    | /file15.php                                       | 2025-10-03 15:08:45.966794+00
      36 | 40.113.19.56    | /atomlib.php                                      | 2025-10-03 15:08:46.052841+00
      37 | 40.113.19.56    | /aa2.php                                          | 2025-10-03 15:08:46.138764+00
      38 | 40.113.19.56    | /gfile.php                                        | 2025-10-03 15:08:46.224591+00
      39 | 40.113.19.56    | /nfile.php                                        | 2025-10-03 15:08:46.311504+00
      40 | 40.113.19.56    | /cabs.php                                         | 2025-10-03 15:08:46.396944+00
      41 | 40.113.19.56    | /usep.php                                         | 2025-10-03 15:08:46.483186+00
      42 | 40.113.19.56    | /abcd.php                                         | 2025-10-03 15:08:46.570358+00
      43 | 40.113.19.56    | /ilex.php                                         | 2025-10-03 15:08:46.658465+00
      44 | 40.113.19.56    | /hk.php                                           | 2025-10-03 15:08:46.746744+00
      45 | 40.113.19.56    | /file1.php                                        | 2025-10-03 15:08:46.834331+00
      46 | 40.113.19.56    | /rrr.php                                          | 2025-10-03 15:08:46.92382+00
      47 | 40.113.19.56    | /vee.php                                          | 2025-10-03 15:08:47.00991+00
      48 | 40.113.19.56    | /222.php                                          | 2025-10-03 15:08:47.095895+00
      49 | 40.113.19.56    | /fffff.php                                        | 2025-10-03 15:08:47.185577+00
      50 | 40.113.19.56    | /cool.php                                         | 2025-10-03 15:08:47.289561+00
      51 | 40.113.19.56    | /cfile.php                                        | 2025-10-03 15:08:47.375429+00
      52 | 40.113.19.56    | /new4.php                                         | 2025-10-03 15:08:47.462155+00
      53 | 40.113.19.56    | /031.php                                          | 2025-10-03 15:08:47.54776+00
      54 | 40.113.19.56    | /goat.php                                         | 2025-10-03 15:08:47.636889+00
      55 | 40.113.19.56    | /we.php                                           | 2025-10-03 15:08:47.724788+00
      56 | 40.113.19.56    | /aa.php                                           | 2025-10-03 15:08:47.80998+00
      57 | 40.113.19.56    | /gmo.php                                          | 2025-10-03 15:08:47.895707+00
      58 | 40.113.19.56    | /gm.php                                           | 2025-10-03 15:08:47.982633+00
      59 | 40.113.19.56    | /eauu.php                                         | 2025-10-03 15:08:48.069536+00
      60 | 40.113.19.56    | /2.php                                            | 2025-10-03 15:08:48.155682+00
      61 | 40.113.19.56    | /CLA.php                                          | 2025-10-03 15:08:48.242789+00
      62 | 40.113.19.56    | /wpc.php                                          | 2025-10-03 15:08:48.336367+00
      63 | 40.113.19.56    | /lala.php                                         | 2025-10-03 15:08:48.423806+00
      64 | 40.113.19.56    | /dfre.php                                         | 2025-10-03 15:08:48.512749+00
      65 | 40.113.19.56    | /file3.php                                        | 2025-10-03 15:08:48.598727+00
      66 | 40.113.19.56    | /as.php                                           | 2025-10-03 15:08:48.684506+00
      67 | 40.113.19.56    | /444.php                                          | 2025-10-03 15:08:48.769966+00
      68 | 40.113.19.56    | /file9.php                                        | 2025-10-03 15:08:48.856609+00
      69 | 40.113.19.56    | /yanz.php                                         | 2025-10-03 15:08:48.944013+00
      70 | 40.113.19.56    | /system_log.php                                   | 2025-10-03 15:08:49.030504+00
      71 | 40.113.19.56    | /admin/upload/css.php                             | 2025-10-03 15:08:49.116629+00
      72 | 40.113.19.56    | /wp.php                                           | 2025-10-03 15:08:49.202528+00
      73 | 40.113.19.56    | /admin.php                                        | 2025-10-03 15:08:49.289782+00
      74 | 40.113.19.56    | /f35.php                                          | 2025-10-03 15:08:49.376755+00
      75 | 40.113.19.56    | /info.php                                         | 2025-10-03 15:08:49.462196+00
      76 | 40.113.19.56    | /css.php                                          | 2025-10-03 15:08:49.547774+00
      77 | 40.113.19.56    | /radio.php                                        | 2025-10-03 15:08:49.633898+00
      78 | 40.113.19.56    | /wp-admin/user/about.php                          | 2025-10-03 15:08:49.718909+00
      79 | 40.113.19.56    | /index/function.php                               | 2025-10-03 15:08:49.806662+00
      80 | 40.113.19.56    | /simple.php                                       | 2025-10-03 15:08:49.893433+00
      81 | 40.113.19.56    | /v.php                                            | 2025-10-03 15:08:49.982912+00
      82 | 40.113.19.56    | /fe5.php                                          | 2025-10-03 15:08:50.06874+00
      83 | 40.113.19.56    | /ee.php                                           | 2025-10-03 15:08:50.154924+00
      84 | 40.113.19.56    | /get.php                                          | 2025-10-03 15:08:50.241466+00
      85 | 40.113.19.56    | /file18.php                                       | 2025-10-03 15:08:50.328438+00
      86 | 40.113.19.56    | /c.php                                            | 2025-10-03 15:08:50.415157+00
      87 | 40.113.19.56    | /about.php                                        | 2025-10-03 15:08:50.50094+00
      88 | 40.113.19.56    | /file17.php                                       | 2025-10-03 15:08:50.585732+00
      89 | 40.113.19.56    | /wp-includes/IXR/admin.php                        | 2025-10-03 15:08:50.67756+00
      90 | 40.113.19.56    | /efile.php                                        | 2025-10-03 15:08:50.763741+00
      91 | 40.113.19.56    | /r.php                                            | 2025-10-03 15:08:50.851319+00
      92 | 40.113.19.56    | /t.php                                            | 2025-10-03 15:08:50.952744+00
      93 | 40.113.19.56    | /file88.php                                       | 2025-10-03 15:08:51.037884+00
      94 | 40.113.19.56    | /NewFile.php                                      | 2025-10-03 15:08:51.124456+00
      95 | 40.113.19.56    | /makeasmtp.php                                    | 2025-10-03 15:08:51.22758+00
      96 | 40.113.19.56    | /tiny.php                                         | 2025-10-03 15:08:51.314992+00
      97 | 40.113.19.56    | /marijuana.php                                    | 2025-10-03 15:08:51.401166+00
      98 | 40.113.19.56    | /config.php                                       | 2025-10-03 15:08:51.489659+00
      99 | 40.113.19.56    | /wp-2019.php                                      | 2025-10-03 15:08:51.577475+00
     100 | 40.113.19.56    | /1.php                                            | 2025-10-03 15:08:51.662816+00
...
(183 rows)
Alongside the traffic from my friends, the logs were flooded with hundreds of rapid requests from a single IP address (40.113.19.56) trying to access common vulnerability endpoints and non-existent PHP files. This is a classic example of a vulnerability scan, often preceding or forming part of a DDoS attack. This demonstrates how quickly a publicly accessible server can become a target. 🎯
For MySQL, I've replicated the same visitor-tracking logic that I implemented with PostgreSQL. This demonstrates how a similar goal can be achieved in a different database system by adapting the SQL schema to its specific syntax and data types.
The application logic in the db.py file would also need to be adjusted to use a MySQL connector library (like mysql-connector-python) instead of psycopg2.
Database Initialization (MySQL)
This initialization script creates the necessary tables in a MySQL database to log website visitors and their page views.
-- init-mysql.sql

-- This script creates a schema to log website traffic for a MySQL database.

-- Table to store unique visitor information.
CREATE TABLE IF NOT EXISTS `visitors` (
    `ip_address` VARCHAR(45) PRIMARY KEY,
    `first_visit_time` TIMESTAMP NOT NULL DEFAULT CURRENT_TIMESTAMP,
    `last_visit_time` TIMESTAMP NOT NULL DEFAULT CURRENT_TIMESTAMP,
    `user_agent` TEXT
) ENGINE=InnoDB DEFAULT CHARSET=utf8mb4;

-- Table to log each individual page view.
CREATE TABLE IF NOT EXISTS `page_views` (
    `view_id` INT AUTO_INCREMENT PRIMARY KEY,
    `visitor_ip` VARCHAR(45) NOT NULL,
    `page_route` TEXT NOT NULL,
    `view_timestamp` TIMESTAMP NOT NULL DEFAULT CURRENT_TIMESTAMP,
    CONSTRAINT `fk_visitor_ip`
        FOREIGN KEY(`visitor_ip`)
        REFERENCES `visitors`(`ip_address`)
        ON DELETE CASCADE
) ENGINE=InnoDB DEFAULT CHARSET=utf8mb4;
This SQL script sets up the same two core tables as the PostgreSQL version, but adapted for MySQL:
visitors: Stores unique visitors, usingVARCHAR(45)for the IP address.page_views: Logs each page view, usingINT AUTO_INCREMENTfor the primary key.
Nginx - Reverse Proxy & SSL Configuration
This Nginx configuration is set up to serve a web application securely.
It redirects all HTTP traffic to HTTPS, handles SSL termination using Let's Encrypt certificates,
and reverse proxies requests to a backend application container named 'app' running on port 5000.
server {
    listen 80;
    server_name liormilliger.com;

    location /.well-known/acme-challenge/ {
        root /var/www/certbot;
    }

    location / {
        return 301 https://$host$request_uri;
    }
}

server {
    listen 443 ssl;
    server_name liormilliger.com;

    ssl_certificate /etc/letsencrypt/live/liormilliger.com/fullchain.pem;
    ssl_certificate_key /etc/letsencrypt/live/liormilliger.com/privkey.pem;

    include /etc/letsencrypt/options-ssl-nginx.conf;
    ssl_dhparam /etc/letsencrypt/ssl-dhparams.pem;

    location / {
        proxy_pass http://app:5000;
        proxy_set_header Host $host;
        proxy_set_header X-Real-IP $remote_addr;
        proxy_set_header X-Forwarded-For $proxy_add_x_forwarded_for;
        proxy_set_header X-Forwarded-Proto $scheme;
    }
}
Apache - Reverse Proxy Configuration
An Artifactory-style generated configuration for Apache. It redirects HTTP (80) traffic to HTTPS (443), handles SSL termination, and proxies requests to the upstream server.
<VirtualHost *:80>
    ServerName liormilliger.com
    ServerAlias *.liormilliger.com

    # Redirect HTTP to HTTPS
    RewriteEngine on
    RewriteCond %{HTTPS} off
    RewriteRule (.*) https://%{HTTP_HOST}%{REQUEST_URI} [L,R=301]
</VirtualHost>

<VirtualHost *:443>
    ServerName liormilliger.com

    ## SSL Configuration
    SSLEngine on
    SSLCertificateFile "/etc/httpd/ssl/liormilliger.com.crt"
    SSLCertificateKeyFile "/etc/httpd/ssl/liormilliger.com.key"

    ## Proxy Configuration
    ProxyPreserveHost On
    ProxyRequests Off

    # Add X-Forwarded-Proto header
    RequestHeader set X-Forwarded-Proto "https"

    # Proxy requests to the upstream server
    ProxyPass / http://liormilliger.com/
    ProxyPassReverse / http://liormilliger.com/
</VirtualHost>